Multi Picture Frames for Special Photo
Multi picture frames gathered at thrift stores make a dramatic display for a very special photograph. This one adds a touch of farmhouse.

Do you have a picture that means the world to you? This old photograph is my grandparent’s old farmhouse. It was a four-room home. And not one of the rooms was a bathroom. The bath was a room of its own in the backyard. I spent as much time at this old farmhouse as my parents would let me. It contained more love than that four-room farmhouse could hold. I designed a way to display the photo as grand as the home. It took four thrift and yard sale frames to hold the picture.

Frame sizes
24 by 30
16 by 20
11 by 14
5 by 7
Materials Needed:
white chalk-based spray paint
white chalk-based paint
Black chalkboard paint or use this instead!
Two Paintbrush
Wood glue
Craft glue
Drop cloth 6 by 8
Piece of 1/8 plywood 16 by 20
Wood lattice strips
Piece of 1/8 plywood 11 by 14
Miter saw or box
Piece of burlap 11 by 14
Screws [ size of screws ]
Drill and bit
Measuring tape
5 by 7 piece of drop cloth
transfer paper
craft stick
computer & inkjet printer or take to copy store to print
A favorite 5 by 7 photograph
My tip to apply paint faster.

When I made furniture and home decor to sell when shabby chic was all the rage, I lined all the pieces to paint in the backyard. Then, I used a paint sprayer and coated he piece with a layer or two of white paint. Then, paint the pieces with a brush in the soft shabby color. This gave a handprinted look that’s so popular. I still prefer a hand look to my home decor. Too perfect of a paint job, and the piece looks mass manufactured. The rare times I buy something for our home new, I tend to paint and cover the mass-produced appearance.
Nowadays, I’m making things for the blog. At most, I have 3 things to paint for a weekend. If pieces have lots of detail like frames, I still spray first then paint by hand.
Are you ever stumped by what project to do first? Me too, but this helps.
Painting the frames
Remove the backing and glass from all the frames and set aside for other projects. Except keep the backing for the 5 by 7 frame.
Clean the frames with a damp cloth.
Spread out the drop cloth and place the frames on to spray paint. Halfway through spraying, you will realize, frames have 57 sides!
Apply two coats letting dry in-between each layer.
Filling in the 3 larger frames
Extra largest frame
- Add lattice strips to large frame. Use the miter saw to cut the lattice strips [18 inches ] to fit into the larger frame. Cut enough to fit across the frame.
- Glue strips in place. Then, use the wood glue to glue each strip in place into the frame.
- Let the glue dry.
Large frame
- Paint plywood with chalkboard paint. Paint the 16 by 20 plywood piece with two coats of chalkboard paint.
- Let dry.
- Insert plywood in frame. Add a small bead of wood glue around the inside edge of the 16 by 20 frame. Then place the plywood inside.
- Let dry. Place a book to weigh down until dry.
Medium frame
- Apply burlap to plywood. Next, spread a thin layer of craft glue on the 11 by 14 plywood. Then, place the burlap into the glue. Make sure to lineup the edges and press the fibers down.
- Let dry completely.
- Insert plywood in frame. Now glue the plywood into the 11 by 14 frame as above.
Small frame

Cut the drop cloth to fit the frame backing.
Transfer the photograph onto the drop cloth
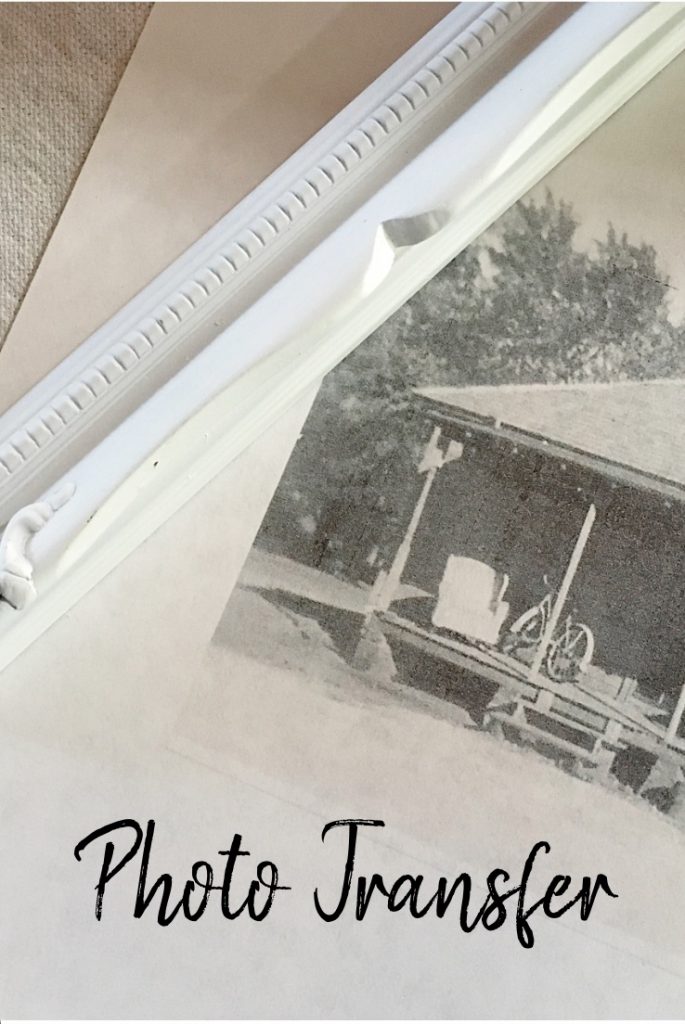
- Scan photo into computer. First, scan your photo into the computer. Add the picture to a document file. Adjust to 5 by 7 inches. Now, flip the photo sideways. Load your printer with transfer paper, so the print is on the shiny side. Print the photo.
- Trim the photo. This helps align the picture on the drop cloth.
- Create the transfer. Center the photo facing down on the drop cloth. Hold in place, and rub the back using the craft stick. Take peeks by holding one edge in place and lifting straight up. Only when the photo is wholly transferred, lift the paper, and toss it. Remaining ink can get on clothes, I know.
- Add drop cloth image to frame. Apply a light layer of craft glue to the backing of the small frame. Now, center the drop cloth into the glue to hold in place.
- Glue the backing into the frame.
Attach the frames together

Attach sawtooth hangers along the top of the large frame.
Apply four heavy-duty hanging strips along the sides at the top and bottom of the small frame. Next, from the back of the medium frame, add screws into the back of the small frame. Center the medium frame on top of the large frame using the hanging strips. Then, add screws from the back into the medium frame. Do the same steps adding the frames to the extra-large frame.

For a permanent frame, use wood glue to attach the layers of frames. Then add screws from the back of each frame.
Here’s a post of the first layered frames made several years ago.