
Homemade Furniture Wax Turquoise

I adore flaws, live for defects…
buy the blemished piece of furniture…
make imperfect things for our home.
As well, I will try ideas….and sometimes flop!
This time…I didn’t flop!
Handmade Furniture Wax Turquoise
Thanks to an idea from an endearing reader, I’m added turquoise to my autumn decor this year. Just small touches along with the grays and creams.
Here’s the post to the handmade chalked based paint wax I made and click this for the wax of many colors.

To demonstrate wax in colors I needed something with plenty of grooves. Places for the wax to hang out. So, I made a box. A rustic box made from furring wood. Furring is pine board with a rough finish on one side and sanded on the other. Tip: furring is perfect for shiplap. Some furring boards are rough on all sides.
I cut two 1 by 3 furring boards to 13-inches and two 1 by 3 boards to 5 1/2-inches. On one 13-inch board, I laid out a design of leftover trim scraps. Like putting together a puzzle only easier…you can cut the pieces to fit!
Once the pieces fit, I glued them in place.

Next, I glued the boards into a box. While the glue dried, I cut two 1 by 3 boards to 11 1/2-inches. I glued these boards in place to made the bottom. The bottom is slats.
I painted the inside of the box plus, the sides, and back of the box black.

For the puzzled front, I aged the wood trims.

Next, I dry brushed over the aged wood with a creamy white chalked based paint.
Now to apply the handmade furniture wax in turquoise

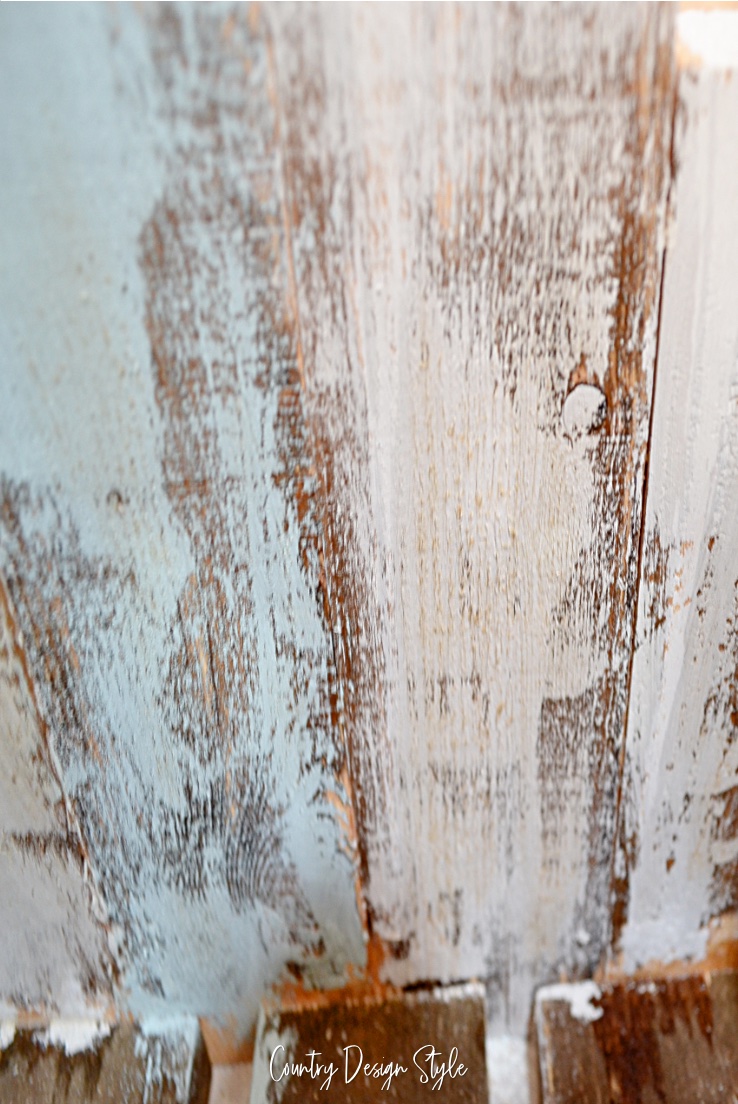
Now for the turquoise wax!! Above is the wax being applied to the rough furring board surface. You can see the turquoise in the grooves.

On the left, the turquoise wax is buffed. On the right, waiting to be buffed.

Appling the turquoise wax to the front was fun! 😀 I globbed it on, pushed it into the grooves then buffed over it all to a shine.

I filled the box to overflowing with inexpensive faux {fake} mums. The back with a slight turquoise shine and color in the grooves. For the most part, the wax gives a shine and not too much turquoise.

The front with aged wood picking out from the creamy white paint and turquoise wax in the nooks and crannies…perfect for autumn!!

I made this pinnable image for you to save to your favorite board to find later. You will want to try homemade furniture wax in turquoise.

Did you see, I also made red wax?


Wonderful seeing the color you put into this project! I bet this would look gorgeous on a piece of wood furniture! wonderful idea! I love following you site.
Linda, I happy you’re following. You should start up a blog again. 😀
Your so sweet. I may do that again in the future. I did win a contest with a project…making over my kitchen. I then won 2nd on another so I am doing the bathroom…I’m so busy right now! I was posting a new project I finished everyday, sometimes 2-3.
I enjoy reading your blog with all your beautiful projects. Your tutorials are easy to follow and understand. Have a wonderful day!