
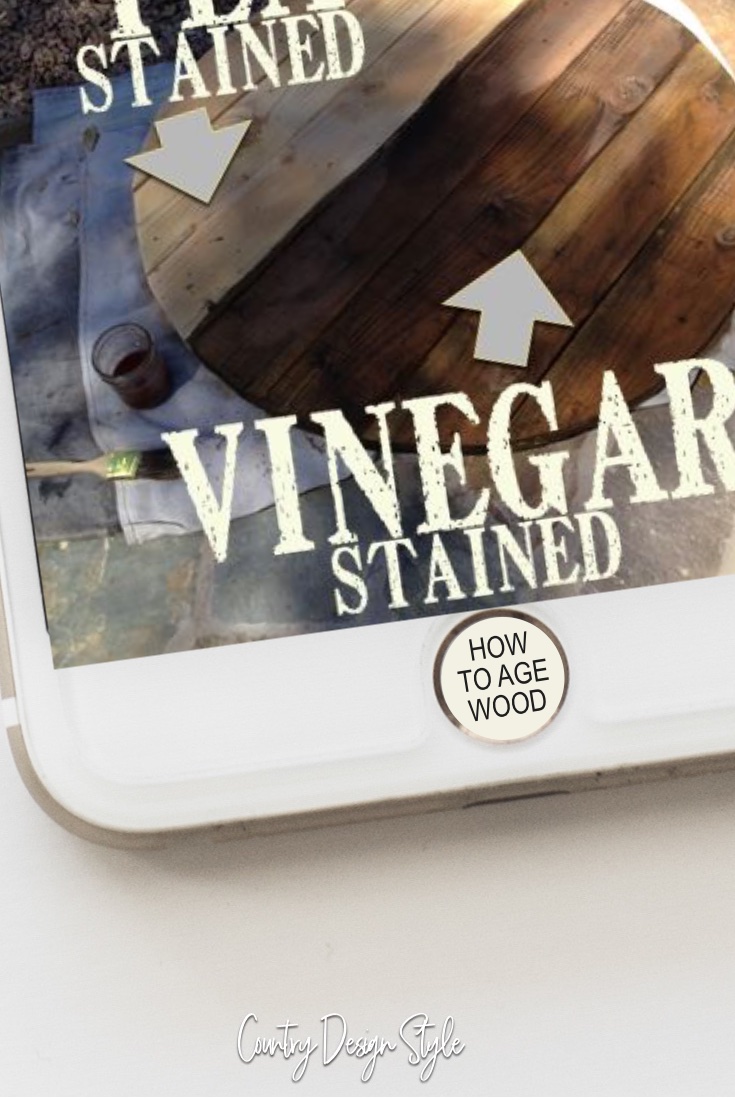
Aging Wood Instantly – turn new wood into barnwood
Let’s save money and learn how to make your own barnwood.
After moving to the land of barnwood in Oklahoma, I realized true old barnwood has bugs! Eek! If bugs creep you out, let’s make our barnwood that doesn’t have bugs!
The only way I know that’s cheaper than this technique is to leave boards outside to weather naturally. I don’t know about you but I don’t have that kind of time.
The problem with real barnwood
- Unless you have family or a friend with an old barn it’s expensive!
- In some areas, it’s hard to find.
- Barnwood can be brittle and has various thicknesses and widths.
- Cleaning and sanding the wood to get ready to use is daunting.
- It can have bugs! The thought of this one stops me in my tracks every time.
So instead, I find myself aging wood instantly for many of the DIY projects I share here on Country Design Style.
Let’s do this together today, OKAY?
This post contains affiliate links. I will make a commission for your purchase at no extra cost to you. Think of it as a friend letting you know where I found a product I use, love, or want. Click here to read my full disclosure policy.
Supplies and tools
Steel Wool – Grade #0000 {A higher grade can work but takes longer to break down}
White vinegar
Black tea bag
2 pint NEW or clean and dry mason jars {I like the wide mouth jars for this…better to fit the paintbrush!}
Two paintbrushes
Hammer and one nail
Oh! A piece of new wood to age! 🙂
Making the mixture
[Do this 24 hours in advance]

Tear the steel wool into small pieces. I’d say inch pieces, but as you can see the steel wool pulls apart in long chunks. Add the pieces to your jar. Cover it with white vinegar and screw on the lid.
Amounts to use
In a pint jar, tear a quarter of the pad and add 1 cup of vinegar. If you’re making a quart, tear 3/4 of a pad and 2 1/2 cups of white vinegar. Do not add too much steel wool to the jar. The amounts above are enough to produce the effect needed.
Important next step

Punch 3 small holes in the seal of the mason jar using the nail and hammer. Notice I add the date of the solution. I age wood often! In my workshop, there are several jars with different dates. The solution darkens over time.

Add the seal and ring to your jar. Set in an area away from sunlight, and in a precise temperature location. Outside if possible. I place mine in the garage or my workshop. I had a reader contact me that her jar sitting in the laundry room exploded. Vinegar can cause the temperature of the steel wool to rise.
Be extra cautious, add holes to the top, and place the jar in an even temperature location.
Now the hard part…wait 24 hours!!!!
Click to check out the printable store.
Ironed vinegar after 24 hours
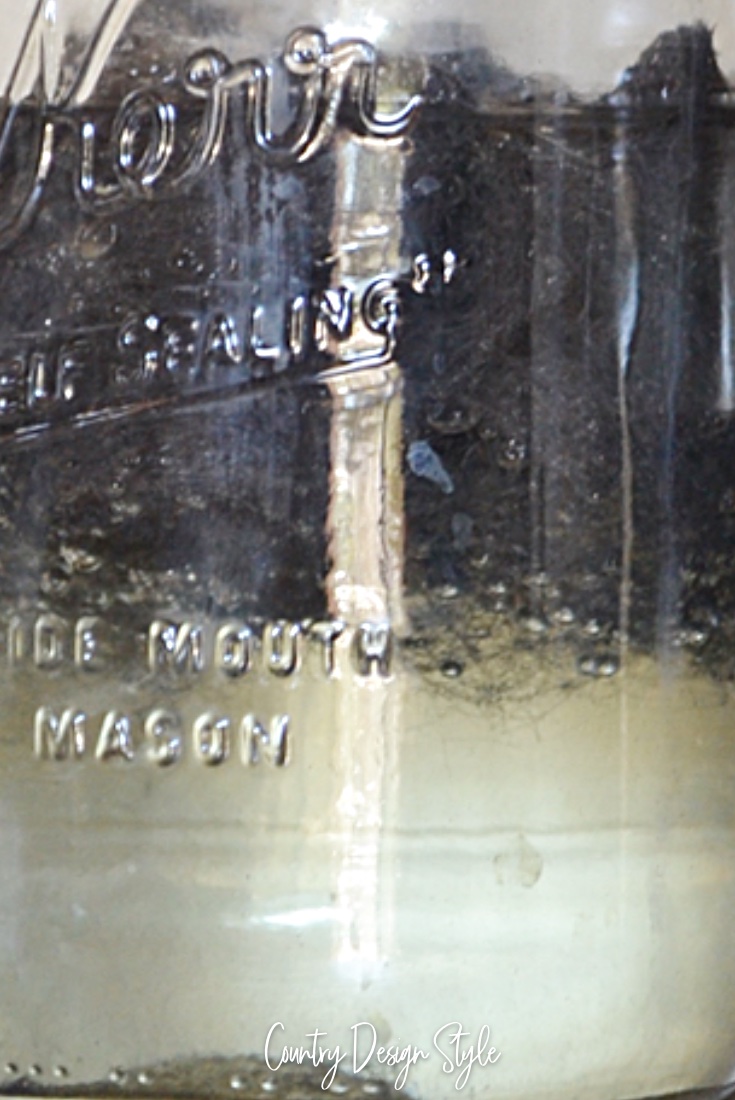
After strumming your fingers, pacing the floors, drinking too much coffee or tea {given the cast of characters}, and waiting for the 24 hours to pass, the jar of steel wool and vinegar will look…
about the same!
But trust me. It is now “ironed vinegar.” If you wish, you can strain the bits of steel wool using a coffee filter. Just pour the solution through a filter into another jar. Sometimes I don’t bother straining!
*Ironed vinegar is a term I made up. It’s not official!
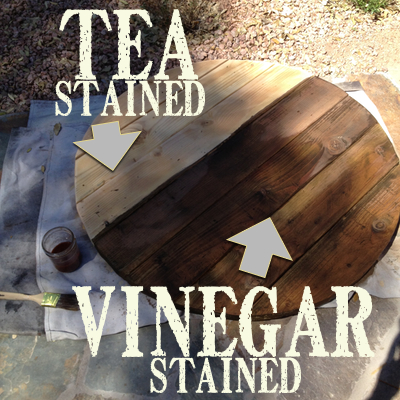
Time to make the tea
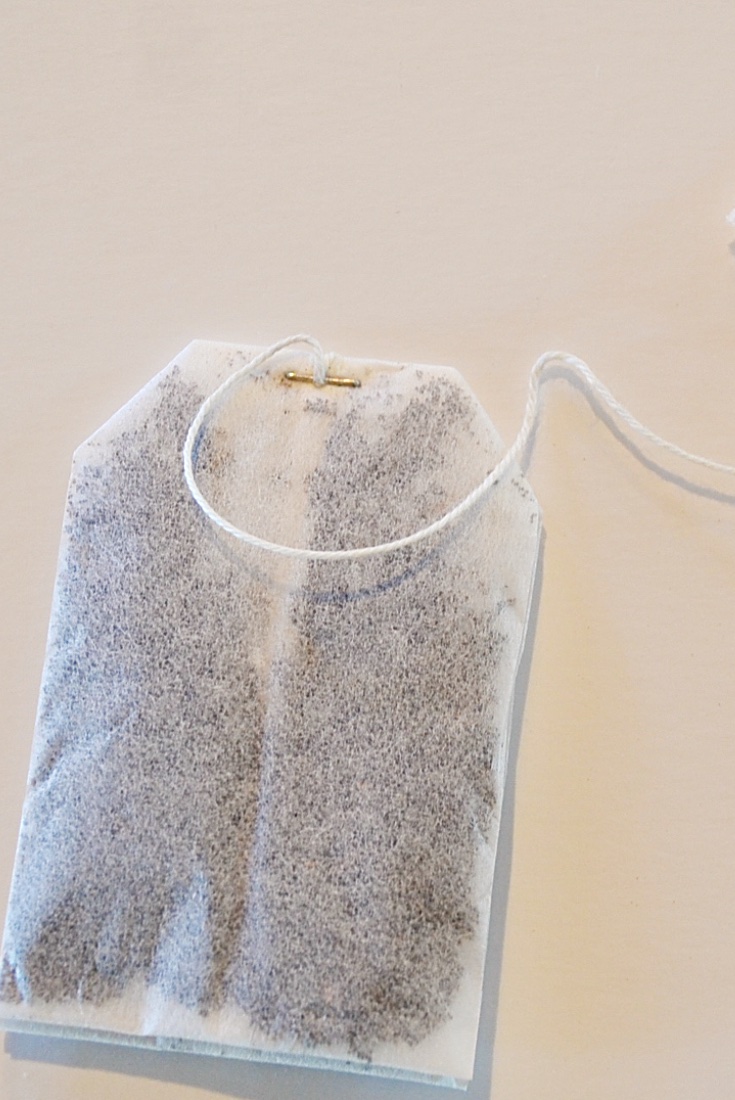
Black tea contains more tannins than most other teas. The tannins in the tea darken the tannins in the wood. Black tea is inexpensive and we know it contains tannins. Save your expensive teas for drinking.
Make a cup of tea or a jar of tea. The tea can be room temp, warm or hot.
Now, let’s age wood!
Paint the tea on your new wood using a regular paintbrush. Cover completely with one coat and let dry completely. So far…
the wood will not have changed much!!
Next is when the magic happens!
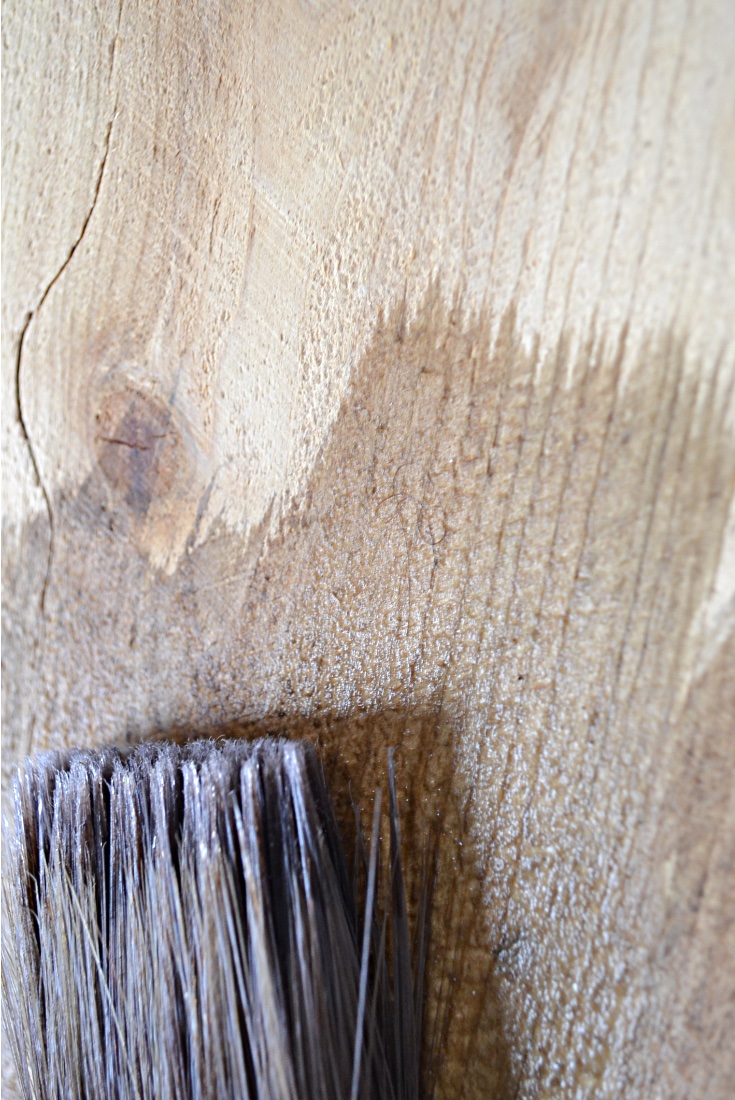
Paint your wood with the “ironed vinegar.” Dip your brush into the vinegar {holding your nose} :/ and paint.
Painting with tea and vinegar is like painting with water. The wood will age while you paint. Don’t worry about brush overlaps. The color evens out when dry. It evens according to the wood grain. Areas that were lighter will remain aged lighter than the darker areas of the grain. The ironed vinegar reacts with the tannin in the tea and the tannins in the wood. It usually darkens more as it dries.

The photo above shows the process. It’s the same piece of new pine wood as it dries with each step.
Using ironed vinegar with chalk-based paints
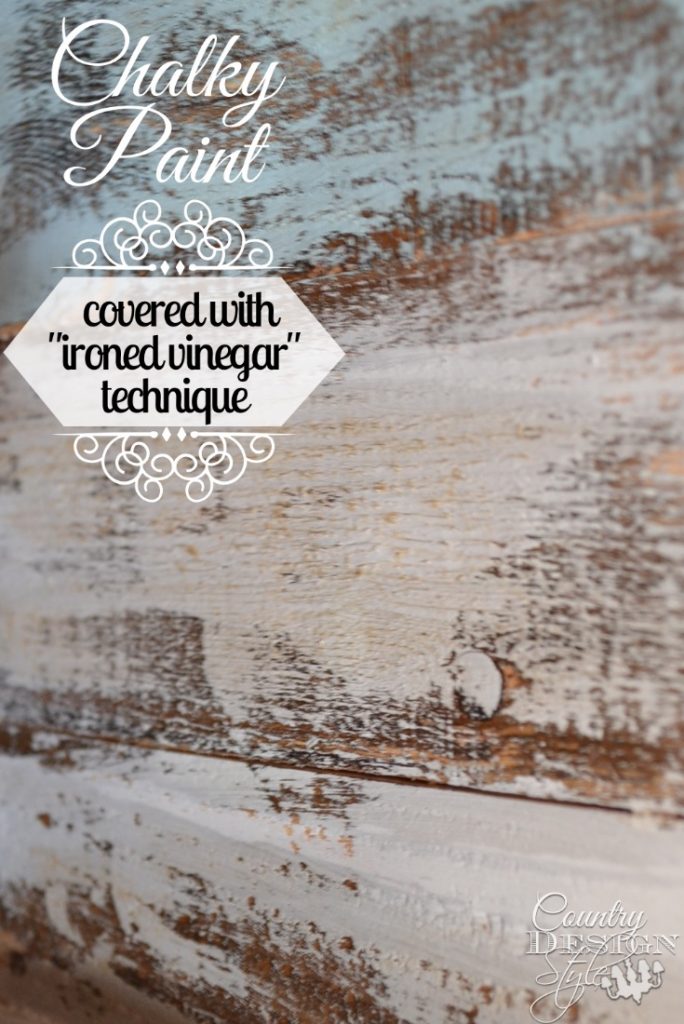
I’ve tested the aging wood technique with chalk-based paints. Here are the results I’ve found.
- Using the tea and vinegar on top of the chalk-based paint results in an aged look to the paint and color. But the look is dirtier aged instead of natural age. Applying the chalk-based paint first blocked the tea and vinegar from adsorbing into the wood.
- Using the tea and vinegar technique first, then applying chalk-based paint works beautifully, IMO! Using a damp soft cloth and rubbing over the paint to reveal the aged wood underneath, makes my heart pitter-pat a bit faster.
A different technique to get gray barnwood
A sweet reader asked what would happen if the teabag was added to the jar of ironed vinegar. I couldn’t believe I hadn’t tried! So I did, and below are the results.

Instead of making a separate jar of tea, I added the teabag to the jar of “ironed vinegar.” First, I strained the solution through a coffee filter to remove the bits of steel wool. Then added a teabag to the “ironed vinegar.” I let it sit for 5 minutes.
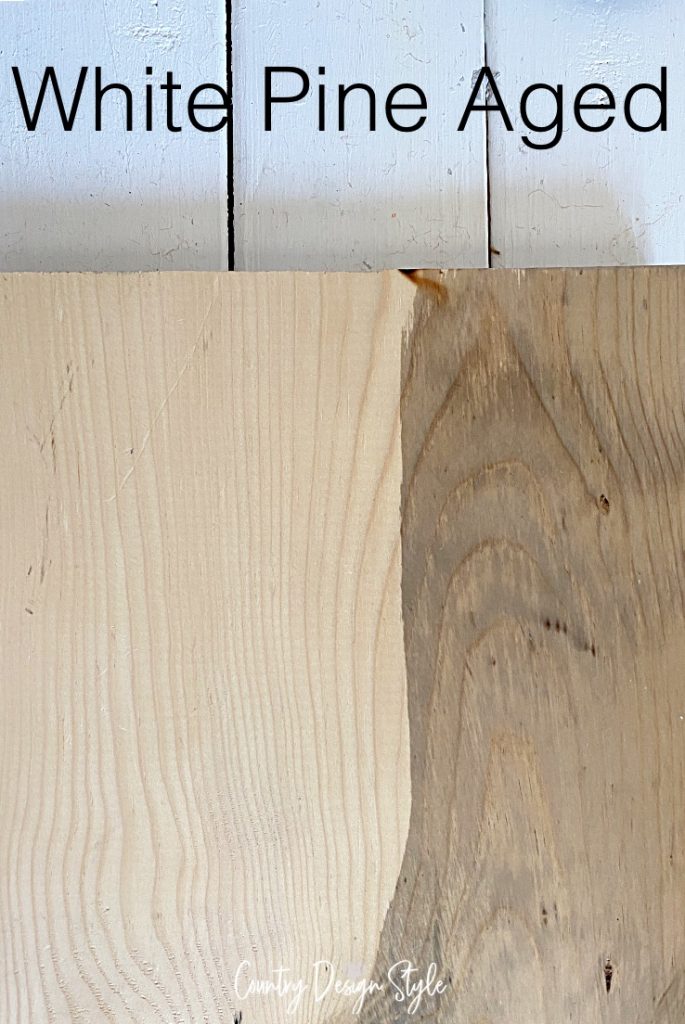
This white pine board shows the first technique. I used it to show how to age wood on a live video.

The area on the left is still wet with the ironed vinegar and tea mixed together.
At first, I didn’t think anything would happen.
And then…

The solution dried and turned the white pine gray.
Please be aware; you may get slightly different results due to the type of wood.
Sanding the layers to see more magic

The tea and vinegar you painted soaked down into the fibers of the wood. By sanding you can see lighter shades of aged wood.
Notice the gray under the color.
I created my first web story on aging wood instantly.
Additional notes & questions answered
When you finish painting with the tea I pour it out. Tea will mold. yecch!

I keep leftover “ironed vinegar.” When I make a new batch, sometimes I’ll add it to an old batch after 24 hours.
The jar on the left is 3 weeks old…the jar on the right is about 3 months old.
How does the aging process work?
What happens to age the wood? Black tea has lots of tannins. Tannin adds a dark color to tea and bitterness. It’s natural in black tea. The wood soaks up the tea with tannin. The vinegar acid breaks down the steel and adds iron to the vinegar. The iron adheres to the tannin and they both turn the layer of wood dark or “aged.”
Using other teas and vinegar
I get asked about all other types of vinegar from apple cider to balsamic vinegar. My personal opinion is white vinegar works, it’s available and inexpensive. I did finally try red wine vinegar with the same results. I’ll still use white vinegar for aging wood and use the expensive kinds of vinegar for salads.
Readers also ask about using a different type of tea. Fancy teas may or may not contain tannins. Black tea works and, like plain o’ white vinegar is inexpensive.
The brushes I use
A question I get asked often is, what is my favorite paintbrush? I love these brushes !!!
When painting a bookcase, this one with a short handle is great. It fits between the shelves!
Things to watch for
The technique will stain your hands. If you’re concerned, do wear gloves.
If you keep ironed vinegar in a mason jar for several months, the ring may rust. You can use clean plastic containers if you wish. Do poke holes in the plastic lid.
When applying the ironed vinegar, you may notice lighter and darker areas where your brush overlaps. Don’t worry! As the wood dries the color evens out.

The cost of the aging wood instantly solution
This is my rough estimate to make a pint of tea and a pint of ironed vinegar.
Steel Wool .18
Vinegar .50
1 Tea Bag .04
2 Pint Mason Jars 2.80
Total $3.52
Since you’re painting with a water-based substance, the coverage is approximately 25 – 50 square feet.
You can see why I enjoy making weathered wood using tea and ironed vinegar.

Your aged DIY barn wood looks amazing with Chalk Couture! Click to learn more about Chalk Couture and about this quick way to make farmhouse decor for your home.
The tabletop that most likely brought you to this post!

Age Wood Instantly
How to turn new wood into aged barnwood
Materials
- #0000 Soft Steel Wool
- 2 Mason Jars with Lid
- White Vinegar
- Black Tea Bag
- Hot Water
- Coffee Filter
- Your new wood!
Tools
- 2 Paintbrushes (one for tea and one for "Ironned Vinegar"
- Hammer
- Nail
Instructions
- Tear approximately 1/4 of the 0000 Steel Wool adding pieces to the mason jar.
- Cover with white vinegar.
- Using the hammer and nail make holes in the lid of the mason jar.
- Add the lid and place in a safe place for 24 hours.
- After 24 hours, make tea in the other mason jar. Let steep for 3 minutes.
- Paint the tea on your new wood. Let dry for a few minutes.
- While the wood dries, Strain the steel wool using the coffee filter. I usually empty the tea and strain the vinegar into the tea mason jar.
- Next, paint the wood with the "ironed" vinegar.
- Watch the wood turn old.
- Let dry and get creative with your new "old" wood.
Notes
Additional notes
- For gray barnwood. Add the tea to the irioned vinegar and apply to the new wood.
- Please remember, you are working with a natural product. Your results may differ. Plus, different woods turn different.
- Alway test on a small area to make sure you like the results.
- This technique works great with chalkbased paints. You can sand back the paint to reveal "barnwood!"
If you have any questions regarding aging wood instantly leave a comment below or click here to contact me.
In the meantime, I’m counting my pennies and making a cup of tea…to drink!


I am wondering how I might modify this technique to end up with more of an old red barn appearance on rough cut white pine. Perhaps adding some red water based paint tint to the vinegar? Thank you in advance for your reply.
Perhaps you could try redbush tea instead of black tea.
I tried it on various types of wood and interesting find what the differences are. On oak, I tried the steel and vinegar mix and it turned completely black!! And it was a pretty shiny black too!
I was wondering whether this would be safe to do indoors. I live in an apartment and I’m thinking of making a bead garland for my Christmas tree.
Hey, Alanna, Yes, it’s safe to do indoors. I use it in my craft room upstairs or in the kitchen all the time. I do suggest you let the vinegar and steel wool sit outside in the shade if possible. Although, I’ve let my set inside without any problems. Over the years, I’ve only had one reader who had a jar crack in her laundry room. The heat in the room could have added to the broken jar. It makes the wood beads look great and so easy. Thank you for reading and asking a great question.
Thank you so much for this post. Hopi g you can help me! I’ve got actual real barn beams that have been weathered GRAY in the sun. We cut the ends and of course they are normal wood colour. We would like to weather the ends grey to Match the beam. I’m afraid to turn them brown with this technique. Is there a way to ensure a gray colour rather than brown or your best tips for gray. Thanks so much!!!
Hi Lisa, Do you still have the ends you cut? If so, I suggest using them to test. Matching paint and stain is hard and matching natural aging is tougher. But, try adding the tea into the “ironed” vinegar solution. Let the tea set for about 5 minutes. Then test on a part to the end pieces. When I use the solution or even stains on the cut ends they usually turn darker than the rest of the wood. Otherwise, you could try mimicking the beans with paint. Something like matching paint to the main color. Then two paints lighter and darker to mimic age. I do wish you luck with the project. Let me know how it turns out. ~Jeanette
Hey, Lisa. I was wondering about your real barn wood beams. How did they turn out?
Hello and thank you for the wonderful tips and techniques . As an FYI —another YouTube vid on the same process shows that you can boil the vinegar and get fast results in just an hour rather than waiting on the ironed vinegar for days. Tried and true in his experimenting. Makes sense too since it has been suggested that it ‘cures’ faster in the hot sun.
Thank you so much Kendra for sharing this tip. I’m going to give it a try. Many times I use the “ironed” vinegar before the 24 hours, anyway, but I like to try all techniques. Hugs.
I have been soaking the steel wool and vinegar and it is not changing colors. HELP
Shawna, no worries. The vinegar will stay clear in 24 hours. Go ahead and use the “ironed” vinegar. First paint the wood with tea, let dry. Then paint with the vinegar. The wood will aging instantly! Reach out if you have any other questions.
I love this idea, thank you for posting 😊 I do have a couple questions…I would love to use this instead of a regular stain on our new deck that was put in last year. Can this be used on something outside that will be exsposed to the elements including snow? and what about people walking on it! Is that going to be ok?
HI Candyce, Just wondering if you actually tried it on your deck and what was your result. I would also like to try this on my deck but am unsure. I know it depends on th etype of wood that you have. Thanks
If you use this on Dougfir will it work? I’m trying to use this on a new structure we just made for my vintage booth 🤔
Thanks for the help
Yes, Debbie. The aging wood technique works on all woods. Some due have different color effect.s. Perfect for your vintage booth and inexpensive too.
Loved reading and learning from your blog. I am working on creating a fall porch sign made from fence wood. I’m eager to try aging it before I paint fall images on it. I was wondering if coffee would work in substitute of tea because it also contains tannins? I figured it would be easily accessible since my husband drinks lots of coffee, but neither of us do tea. Thoughts?
I am not too picky about the hue of the wood, so long as it has the aged look, browner might be better for the fall theme though.
I LOVE crafting but sometimes get anxious in the evolution of my ideas for fear that they won’t turn out ❤️
Hi, Melinda, yes coffee can work. Although it doesn’t have as many tannins as tea. It’s very flexible too. If you find you don’t like the results, sand the wood and try again. That’s the joy in DIY, you can always DIY it again if you don’t like it. You can always test on an extra piece of fence wood to see your results. Just relax and have fun with it. Hugs ~Jeanette.
I decided to go with the tea, since I wanted to complete my project before October, so I stuck with your tried and true recipe. I’m thrilled with the results. I had a few doubts when it was still processing, and there are a few lighter areas that I must not have coated well- but they just add to the character of the wood!
Now I need to try your wax sealing process to protect it. I used vinyl stickers on it, will the wax be compatible with that, or would I be better off using mod lodge? I don’t want a glossy look. Thanks! I love how relaxing the process is.
Melinda, I’m thrilled you like the process! I’ve never thought about how relaxing the process is, but it is relaxing. I feel like I’m having a moment with nature and transforming it with natural items. You don’t necessarily need to seal the wood. I just clean it with a damp cloth. About the only time I seal the wood is if I’m using it with food. Your vinyl stickers should do great.
Hello I’d love to try this technique. I have a older table but it’s Stained with an oak finish and polyurethane.. So I should sand and remove all the polyurethane and the color down to the natural wood? Would there be something I should clean it with before I do this technique with the vinegar and steel wool and tea ? Lori
Hi, Lori, The polyurethane needs sanding off for the tea and vinegar to get into the fibers of the wood. I suggest sanding an area under the tabletop and testing to see if you like the look. I think you will love the look.
I’ve used this technique many times with great results. I just did a pair of barn doors, and for some reason they turned a reddish tint. Never had that happen before. Always got the grayish and brown tint. Wonder what was different? I’m staining them dark walnut, so I think they’ll be ok.
Hi, Kathy, two things could cause a reddish tint. The type of wood. Some pine wood turns reddish. The “harder” the pine the darker and redder the color. Another is the amount of time the vinegar sits with the steel wool. The longer the mixture site the darker the color, in most cases. We are working with nature and sometimes it does work as expected. You can sand the wood to lighten the color too. Send me a picture of your finished doors.
Are you able to stain the wood after aging it just like you would if it was real aged barn wood?
Yes, Mason. You can stain the wood after aging.
Thank you so much for your generosity in sharing your technique. Your explanation was so clear. Looking forward to trying this! Happy to have found your website.
Hey, Luci! I’m happy you found the website too! Please reach out if you have any questions. I love helping others with their DIY projects and their homes.
Hello
I would love to do this effect on my server boards. Is this food safe though?
Can I use my timber oil over the top?
Any help would be fantastic. Thank you!
Hi, Tegan,
Yes, you can use timber oil over the top. It may darken the wood a bit for a while. I do not use aged wood in direct contact with food. Although, I’ve tried to research if the technique is food safe, I’ve never found a direct answer. So, I use decorative papers or napkins to serve food.
I did it! I love the results only scary part is what kind of protective clear coat should I used I don’t want it to change the color and don’t wanted glossy at all. Any advice?
Yea, Emma! It’s really easy to do.
If you set glasses you might have a ring. Personally, I rarely add protection. If you plan to use wet cups you can use a matte clear finish. Do test in a hidden area first. I’ve been using a clear matte spray paint on Chalk Couture projects. Although I haven’t used it on aged wood, it might work and it easy to apply.
I can’t believe how,well this worked!
I boiled the water and added two black tea bags. The vinegar had hardly changes color as you had said. I thought it may turn color a bit but wow was I surprised! I love the darker gray that it turned the wood. Thanks!!
Roxanna, I’ve been using this technique for years now and it still surprises me with the results. I love it and the price! Thanks for reading along and trying the technique.
Jeanette,
Love this technique! My boards went from a pale tan to a medium gray with a slight brown tint. If I would like it to be a bit darker, do you think I can repeat the process again or maybe just another tea wash? Thoughts???
Hi, Tracy! Thanks for asking your great question. Actually, you can get darker brown results by letting the vinegar and steel wool sit for longer than 24 hours. The longer it sits and darker the results. Right now I have a jar that I made other a month ago. 😉
Let me know your results.
Awesome suggestions and results!! Pretty innovative too!
Thank you, Sarah,, It’s my favorite way to make barn wood. Thank you for stopping by.
Hi! Thanks for the blog. It’s quite informative!
I had a question about the depth of the effect when treating cedar. I am in the process of making a cedar or pine kitchen table for my home. I haven’t decided yet, but I’m considering using this technique to age the wood as I appreciate the gray that cedar turns.
How deep does the aging go? If the table is scuffed or dented, is it likely that the new wood will bee obviously show through? I plan to seal the table, but I’ve not decided yet about a topcoat of any kind. If I don’t put on a topcoat, will there be any future treatment with ironed-vinegar required?
Thanks again!
Hi Ian, Thank you for reading the post. I love the ironed vinegar technique. You will too. The depth of color varies on hard and soft wood. The tea and vinegar penetrate deeper on softer wood. Cedar is soft. Different grades of cedar are different too. Cedar fencing is quite soft. I tell readers to test on scrap boards to understand the effect you will get. Any dents, scuffs or marks on the board remains. The marks may become darker according to the fibers around the marks. Topcoats are a personal preference. I tend to leave the wood as is or apply a light coat of wax for protection. Others like to add a poly to protect. I had one reader that applied lacquer over her end table. I hope I’ve answered all your questions. Send me photos of your table. I would love to see it. You can click “share your project” above to send photos.
Best of luck and have fun. Jeanette
I would like to create silhouette figures on reclaimed wood using acrylic paint, but with an aged finish surrounding the silhouette. In your experience, does it sound feasible to: 1) use the tea/iron vinegar treatment on the whole surface, 2)seal the surface with sanding sealer, 3) paint on the silhouette in acrylic, 4) seal the whole thing with wax/oil/varnish. I realize that this is an extensive list, but I hope you can advise me. Thanks.
Hey, Chris, The technique will work great using your steps. I don’t even use the sanding sealer. I create many signs using the tea and iron technique. I use craft paints for the lettering. Then finish with a wax. My favorite wax is my homemade wax. Here’s the link https://countrydesignstyle.com/homemade-wax/
Thanks – I appreciate your input
Hi Jeanette…. firstly this is the best explained diy stain post i have come across from pinterest! Thanks for posting it. My question is that can this stain be used OVER the chalk paint to create dark effects and then sealed with a topcoat? What will happen if i add black tea into the vinegar solution itself instead of using both separately? Will the effect be good, bad or ugly?
I love your easy to follow diys…. they are so helpful…. glad i found you!
Thanks in advance,!
Hi, Ruchi! The technique doesn’t work as well on top of chalk-based paints and here’s why. The tea and vinegar both need to soak down into the fiber of the wood. Chalk-based and other types of paint tend to block them from soaking into the fibers. But, I have tied it and it does change the color of the paint a bit. To me, it seems to make it dirty looking. I do, however, love the look of aging the wood, then painting with any type of paint. Then distressing to reveal the aged wood. About adding the black tea to the ironed vinegar…I can’t believe I’ve never tried it! But if you give me 24 hours, I have a new batch of ironed vinegar soaking. I’ll give it a try and let you know my results. Thank you for the compliment! I’ve done a ton of research on the what, why, and how of the technique.
Ruchi, I replied by email and I wanted to reply here too. I updated the post to include the results I got. I’m planning a few projects with different wood to see those results too. I love the gray color! Thank you so much for asking!
Hi Jeanette,,,, firstly, a BIG THANK YOU for the quick revert. Frankly, I wasn’t expecting it so soon and a personal email too!!! That’s real effort and dedication… hat’s off to you! Am so glad yo tried out my idea practically and it worked for you. Guess now that I can actually see the results with my own eyes; am gonna be using it too for my next project. I have the steel wool and vinegar already brewing in a jar. Just need to add in the tea now! Wish me luck. Too bad it doesn’t work well on top of chalk paint was hoping I could use it as a home made glaze 😉
Look fwd to seeing your projects with this style!
Cheers & Happy DIY’g
Ruchi, When you get a chance, send an email with photos of your results. I have a few projects planned for this weekend and will try the “new” technique on different woods. Have you looked at my homemade wax recipe? If you make a soft wax with a little tint, it adds dark effects and protection too. Here’s the link to the wax recipe. Super easy to make. https://countrydesignstyle.com/homemade-wax/
I just have one question. You say to leave the solution in an even temperature place, preferably a garage. I live in Arizona & sometimes my garage is hotter than outside! I don’t want to leave the mixture in the house if it can explode. Any suggestion, other than waiting until winter when the temperature drops a little? I have a project I wanted to complete by fall, but I guess if I have to wait, I’ll wait.
Hey, Kathi, Actually I live in Arizona too! We are now in the mountains but when we lived in Scottsdale, I placed the solution outside next to the house on the half wall around our air conditioner. I’ve only heard of two incidences of the jars breaking. Another idea is using plastic containers. Not as “charming” but it works. Do make holes even in the plastic top.
Jeanette
How much wood will the 1 cup of iron vinegar cover?
We are making a headboard for a full size bed and I am wondering if I need to make several batches of the iron vinegar?
Thank you
Robin
Hey Robin, Instead of making several batches, just use the measurements and double or triple the “recipe.” If you make batches, they could be slightly different in strength. A cup of ironed vinegar covers approximately 8 – 10 square feet. Plus, if you have any leftover you can save it for smaller DIY projects. In my workshop right now I have 5 jars made at different times. I label the top with the date.
Found your site from “Chalky Paint Ironed Vinegar” pin. I wanted to share my experience using steel wool and apple cider to stain an entire ceiling. I was hoping for a gray ceiling but it was not to be however I am very pleased with the results and the cost.
* 5 1/2″ yellow pine tongue and groove boards
* Strong Tea
* Apple cider Vinegar and Very Fine 0000 Steel Wool cut up in small pieces (I found leaving it in hot sun helped speed up reaction)
* Bri Wax and yard sale car buffer
I painted each board with tea. Then painted each board with steel wool vinegar. I found that the more knots the better. They were the most beautiful boards. After the boards dried I applied Bri Wax with an old t-shirt. I let wax dry then found the hand-held car buffer gave a quick buff to the boards. The ceiling is very unique. Love your site and wanted to share my experience with this technique.
Christa, WOW! I bet the ceiling is stunning! I love the knots and deep wood grains. The yellow pine tends to turn darker instead of a grey. I’m working on some ideas to get a greyer color, so keep following along. Thank you for sharing your experience!
Hi! I weave white oak baskets and would like to age some them for appeal and comparison. White oak ages differently inside than outside. The ironed vinegar sound like it would work for outside aging. But I’m unsure about the tea treatment. Do you have experience with white oak?
Hi, Vernon, Thank you for reaching out to me about the tea and ironed vinegar. I have not used the technique on white oak. I have tried it on oak items found at thrift stores. First I would sand off any finish on the piece. Then use the technique of paint it with tea, let dry, then paint with “ironed” vinegar. The oak usually turned very dark.
My suggestion for your baskets would be to use strips before weaving to test the results. Please let me know how the white oak responds to the tea and vinegar. Your baskets sound beautiful.
Thanks for your blog on aging wood . I am about to embark on a bespoke ( read expensive even though it’s pine) staircase. Any tips for this ? I read elsewhere it aNd to 180 grit first – any thoughts please ? Thanks so much if you find the time to read this.
Hi, Gail. Thanks for reaching out to me. If you’re doing a pine staircase that has a finish already I would sand to remove the finish. The tea or vinegar cannot get through the finish to the fibers of the wood. If the staircase is new without a finish, I would suggest a light sanding first due to the scope of the project. Wood can have saw marks that might show more with the aging technique. Hope this helps. I would love to see photos of the finished staircase.
Does the wood smell lime vinegar afterwards?
Tricia, there could be a slight vinegar smell after the treatment. It does vary. But the smell does go away in a day or so. Thank you for reading. Jeanette
Hello! Love all the info! Have you worked with poplar? I did the vinegar wool treatment on it but it went more brown instead of grayish brown which is what I’m looking for. After reading your post I’m thinking it’s low in tannins so would need to do the black tea treatment before? Thoughts?
Thank you!
Hi, Paige, If popular is whiter than brown to start with it “may” turn grayish. If it’s possible, do a test on the wood if you are wanting a more gray look. I always using the tea first. If the wood doesn’t turn the color you are looking for then I suggest using chalk paints and some of these techniques in the link below. It’s always a guess as to the color the wood will turn otherwise.
https://countrydesignstyle.com/aging-wood-using-chalky-paint/
Thank you for reading!
Jeanette – thank you for your quick response and ideas. It turns out that I just wasn’t very patient because when I looked again later, after it had dried a bit, the color had definitely changed to a lovely gray-ish hue. I’m thrilled with the results. Thanks again!
Okay, this didn’t have the same quick effect for me. I soaked the steel wool in the vinegar for 24 hrs but I noticed it didn’t turn the murky color of your example. I used Irish Breakfast Tea (not my favorite to drink so I thought this would be the perfect use!). Applied the hot tea on my sanded pallet slat, waited just a minute and then applied the vinegar. Nothing seemed to happen other than the normal darkening due to the moisture. Any ideas on my problem? I’m hoping to make frames for some big wall maps from pallets and I would love them to be more gray, than brown.
Julie,
Hum! The vinegar will remain pretty clear after 24 hours of soaking with the steel wool. I tried using vinegar after 24 hours up to 6 months. The vinegar gets the rusty color after about a month of soaking but the effect is pretty much the same. Maybe just a bit more brown and rusty look. The tea needs to have “tannin” to work. I haven’t tested too many different teas. Black and green tea have worked for me. I thought the green tea might make the wood green!! But it didn’t. If the tea is too fancy it might not have tannin in it. I don’t have a clue what tannin is?? The wood does need to dry between the tea and vinegar. I’ve dried it in the AZ sun for 5 minutes up to later in the day. The biggest challenge to using this technique is getting just the right color you want. I’ve found different woods turn different. Even pine turns different. A white pine will be more grayish and reddish pine turns brown. {very rusty brown with older vinegar} Cedar can turn gray or black!! Oak so far for me just seems to get a darker age to the wood. I haven’t used much oak. My suggestion if you want to make sure the wood is gray, would be used a gray stain instead. You can dry brush very lightly the wood with black and/or white paint first and then add the stain too. Try testing different techniques on samples of the pallet wood until you find the results you want. Wish I was closer to help! Let me know what steps works when you find the results you’re looking for. Those maps will look incredible! ~Jeanette
Rae! Where have you been all MY life?? This is by far the best comment and compliments I’ve received! Congrats on finding that man-o-your-dreams! I know this aging wood technique will be perfect for your wedding and making rustic home projects. So much cheaper than trying to buy old barn wood. Send pictures when you get a project finished I would love to see them. Thanks for following, I love enthusiastic followers! 🙂 ~Jeanette
I absolutely LOVE your site. I I just joined this morning. I’m gushing all over with excitement! (I think I peed a little too. Oopsie :/) I’m a veteran crafter, starting when I was expecting my first child. Oh dear Lord, that was 28+ years ago. Phew!: I made her baby book out of cardboard boxes, construction paper, material scraps, markers and ribbon. I was a young single mother on welfare and no money. Since then, I was on the lookout for the “man-o-my-dreams. I finally found him on New Years eve ’11-’12. He’s beautiful, sweet, funny, hardworking, and treats me like a queen. (Looks a little like Tim McGraw, he sings to me, and we dance wherever the music is playing. *swoon*) I am truly blessed. Ok, I say all that to say this; I will become Mrs. Wonderful in a few months. The theme for our wedding is rustic/western. I’m doing ALL of the decorations, centerpieces, and planning the details. It has to be perfecto! I’ve been wondering where to find aged wood for me to use for signs, and the decor for our new home is rustic as well. I can use the same wood where I need it there. I can not WAIT to try this technique. My life will be SO much easier if I can manager to do this right. Keep those ideas flowing girl! I’ll let you know if I’m successful. Wish me luck y’all. God bless. (Where have you been all my life??!)
I’m glad I found your site. I’m making a headboard out of old pallets. I’ve sanded the wood down, would this work on the pallets?
Mary,
Although I’ve not tried it on pallet wood, I have tried it on other old wood. I do believe it would work on pallet wood. Try testing on a small sample to see if you like it. The effect is quick. Usually pallet wood have it’s own aging look. Some wood turns gray and others turn brown. I would love to see the finished headboard. If you wish, you can send in photos and your steps by clicking on the “Share Your Projects” along the right side. I would write up a post about your headboard if you wish. ~Jeanette
Hi! I love what you’ve done with that wood!
Do you think this would work on already finished wood if I sanded it or stripped it? There is some terrible-looking dramatic play furniture in my classroom and I’d like to try this non-toxic technique!
Tabatha, yes it works on finished wood if you sand the finish off. I’ve sanded paint off and applied the tea and vinegar to it several times now. I’m sure it would work on stripped wood too, although I’ve not tried that one…yet! Let me know if you try it and send pictures of your results! Jeanette
I’m looking to refinish our kitchen table and I really love the look of this! Would you recommend using polyurethane (or something else?) afterwards to protect the wood?
Danielle, I would suggest a clear wax. A matte finish would be okay too, but I wouldn’t try anything to shiny. So far I haven’t protected any of my projects using this technique. Including an outdoor table top. I do think glasses or plants would leave rings. Thank you for reading. ~Jeanette
I used this to make a wooden growth chart for a special 1 year olds birthday. I did 3 coats and it is absolutely stunning! It reminds me of old barn wood.
Meredith, isn’t it an amazing technique??? I’m not starting to experiment with paint on top or underneath with loads of distressing. Would love to see a photo of the growth chart. ~Jeanette
Im redesigning a bathroom and creating a wood accent wall. I havent been able to find the time to source salvaged wood so Im going to use your technique on some wood thats been in my garage for a few years. I love that greyish beige look! Thank you so much for sharing!
Lisette, I would love to see the photos from your project! I’m planning to do a barn sliding door when summer ends. Too hot right now in Arizona! Thanks for reading. ~Jeanette
Hi there, would this trick work with balsamic vinegar instead of white vinegar? thanks.
Good Morning,
I’ve made about 6 mixes of the “ironed” vinegar but so far have not tried balsamic or apple cider vinegar. I do know the vinegar needs to break down the steel wool to work. In fact within a week or two the steel wool will not be seen in the vinegar. I have a list of different techniques to try and will add balsamic vinegar to the list. I plan to write an updated post on in August. Although cost wise white vinegar is least expensive than balsamic. Thanks for reading. Jeanette
How did you get the stenciling done? I love it and want to use the same technique on a couple of wine racks that I recently built.
Laura, I did the stenciling using a silhouette machine to make my stencil. A silhouette connect to a computer like a printer and works like a printer but uses a tiny blade instead of ink to make lettering or designs. If I didn’t have that machine I would check for stencils at larger craft or scrapbook stores. Some stencils now are plastic and can be wiped clean and reused. Also a quick release spray helps to hold the stencil in place while pouncing with a sponge brush. Sometimes I use a regular brush for small projects. I can’t remember on this project for sure, but I think I used a regular brush flat topped brush to stencil. I hope this info helps you. ~Jeanette
Hi. I was curious, has anyone ever tried large projects with this technique? We have a ‘pine room’. Pine ceiling and soon to be pine walls. It is all unfinished pine. Kind of a yellow tint to it and I really want to make it look like old weathered wood. I’ve been reading about using the tea and then the combo of steel wool/vinegar. It is exactly the look that I want. Any pointers on doing this on an existing ceiling? Should you make one huge batch of this combo? Or just do small batches spaced out every couple hours so that the coloring is the same? Am I crazy to attempt this on an entire room? I do plan on doing the wall boards prior to installation, really just concerned about doing the ceiling and having it all look the same color. Thank s!
Hello Star, I have had a few readers do this on large pieces of furniture and have loved the results, myself included. If I was doing this to a ceiling I would make one large batch. I usually make batches in pint mason jars and each one is different. I’m thinking is due to the amount of steel wool {hard to judge the amount of steel wool} and the strength of the tea. A little of this goes a long way. I did a large cabinet with a pint of ironed vinegar and pint of tea and still had some leftover. I would also try to paint each board separately on the ceiling. It tends to be darker where the mix overlays. This technique is fast and easier to “paint” than stain or regular paint. On a ceiling it will be drippy because the consistency is like water, so protect the flooring. I’m a go for it kind of gal when it comes to painting and projects, so I would go for it. If I didn’t like it there’s always a fix. Paint or stain over it. Sand it {although the technique does penetrate a few layers of the wood.} I would suggest doing the wall boards first so sample boards. If you decide to go for it, I would love to see pictures! ~Jeanette
Amazing!!! I did this on a custom-made farm table. I was wondering if you have any experience in using Tung oil. I want to put an oil to protect the table since we will be eating on it and I was wondering what would be your advice on the best type of oil to use.
Debbie, thank you so much for the compliments! I need to double check the TV shelf post, because to be honest and clear as mud, the TV is still hanging from one of those tvhangingcontraptions. I simply added the shelf to hang right up against the bottom of the TV. It simply looks like it’s sitting on the shelf. I did it that way for simplicity sake.
The wood technique is A~W~E~S~O~M~E! So try it and let me know what you think:)
I use wordpress, genesis theme, and a combination of two child themes. Don’t get me started on how I ended up using parts of two different child themes, eak! I use a macbook pro and use Pixelmator program along with mac programs for my photos and graphics. I probably do things a bit weird {I’m not technical} but it works for me.
Yes you can definitely add me to your blog roll. I will add you to mine:)
I visited your website and it’s stunning as well! Great furniture makeovers! I do have a couple of things that I could mentor you about and will send you an email. I usually never directly email anyone who comments unless I feel I can give worthy advice.
Great success to you
Jeanette
Jeanette…OK…your blog is absolutely beautiful!!! A beautiful layout and amazing ideas. I love this wood technique and so I had to pin it! Also loved your TV shelf…my husband wanted to get one of those terrible tvhangingcontraptions, but no more. Your idea inspired me! I’ll let you know what I come up with.
I’m also a new blogger and I’m so happy to find your site. If you could share, what software do you use to add all the great fonts and graphics to you blog posts…it is just so pretty.
Looking forward to more of your posts (can I add you to my blog roll??) and Wishing you continued blogging success!!
Debbie
I tried this, only thing to say,,,,, WOW…. other than the time waiting on vinegar it was super fast looks great.
So glad you tried it. My Mike is starting to wonder if I’m ever going to paint again!
hihi, i tryed whis one on my table and it was amazing how it turned into this old looking wood. I love this technique as well as my new/old looking kitchen table and will try more of it on other furniture, most definintly 🙂
thanks for sharing 🙂
Diana from Iceland
Diana, I’m so happy you love the look! Plus it’s easier than painting! Sorry it took a few days to reply, we took a road trip vacation to Colorado and we just return today. I plan on making a shelf to hang under our tv {which hangs in the middle of the wall} and I will use the same technique to age the wood.
Enjoy a creative day!
Jeanette