
How to get the chippy paint technique in a unique way

What is the number one tool need to paint besides the paint?
If you said a paintbrush, in most cases you would be right. But if you’re wanting a chippy paint look, this technique doesn’t require a paint brush.
Life is a great big canvas, throw all the paint you can on it. – Danny Kaye.
That should be the title of this post. The chippy paint technique may make you feel you’re throwing all the paint on it.
Chippy Paint Technique
This post contains affiliate links. I will make a commission for your purchase at no extra cost to you. This helps me maintain the website. Thank you for your support. Think of it as a friend letting you know where I found a product I use, love or want. Click here to read my full disclosure policy.
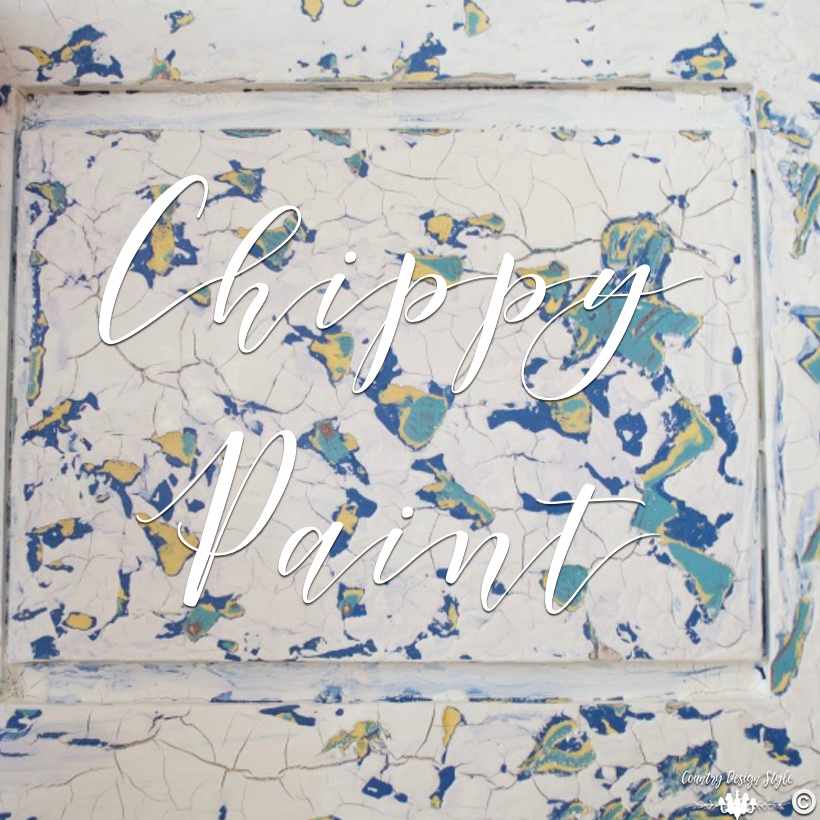
This chippy paint was created using chalk-based paint and latex paint. It’s a great way to use up old paint too!
Note: I would not try this technique on a large piece. But, it’s a perfect technique on small thrift store finds.

You’ll put away your paint brush and grab a piece wood. You read that right, we are painting with wood.
Painting with wood
The very first time I tried painted with wood was on a clients bathroom wall. My client, an artist showroom, hired me to paint the bathroom. All four walls the floor and ceiling. The only request, paint each surface with a different technique.
On the wall without details, like a sink, toilet or window, I painted turquoise. Then I poured red paint into a plastic dish. Next, I grabbed a piece of 2 by 4 wood that fit down into the dish. I would “float” the wood on the paint covering one side. Like using a paint brush, I didn’t allow too much paint on the wood. Then, starting at the top of the wall, applied paint with the flat surface of the wood. Since the walls had a bit of texture the paint caught on the raised areas. It was my favorite of the four walls in the bathroom.
Since that time I’ve painted with wood on wood for signs and table tops when the wood grain is pronounced.
This time I did something different.
Thicken Paint

I’m sharing the technique on a cabinet door. The door is part of my wall craft storage. You need thick paint for the chippy technique.
Three ways to thicken paint
- Use old paint that sitting in the garage.
- Remove the lid and let the paint sit open for a few hours.
- Add calcium carbonate or any of these additives to make thicker paint

You want the paint thick and gloppy. I added a bit of calcium carbonate to thicken. Even if the paint is chalk-based.

Then, dip your piece of wood in the paint and start painting.

This is the door after applying the thick paint with a piece of wood. Using a piece of wood instead of a paintbrush helps you not lay out the paint in an even layer. Do the “meringue” technique shown below. The different thickness of the paint will help with the “chippiness.”
Drying between layers of paint

Let the paint only dry to touch. Don’t let the paint dry completely. In fact, some areas I left a fingerprint in the paint. As long as the paint is going on thick with wood you should not mix the colors. This keeps the paint soft between the layers and makes chipping easier.
Adding different colors

I continued adding layers in different colors, letting each layer dry to touch. Here’s my a coat of yellow with my “wood” brush!
Meringue

The technique is like making a meringue pie. In the extra thick areas, lay the wood on the paint and lift straight up. This makes little peaks in the paint.

Then lightly smooth the peaks with the wood. This adds a chippy look to the layers. Do this for each layer.
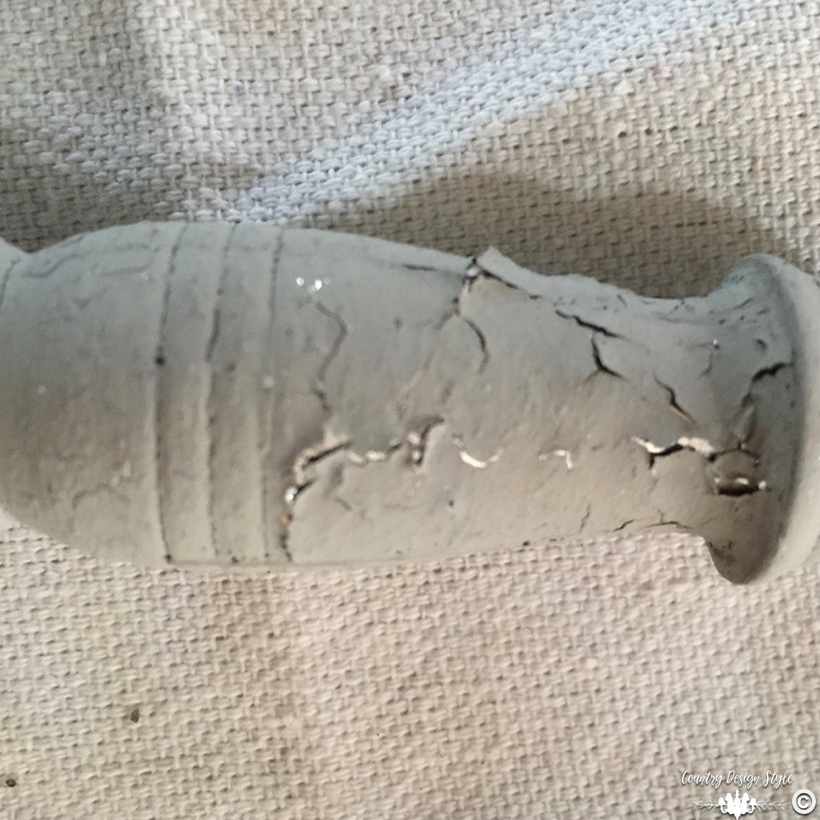
Crackle

Above is a crackle finish that happened when my door completely dried in the hot AZ sun. This may or may not happen in your piece.
Crackle happens when the top layer dries before the bottom layers. As the bottom layers dry it shrinks and pulls the dry paint apart in cracks.
Chipping the paint

Remember, let the paint only dry to touch.
Here’s a brief video showing how easy the paint chips away…if you don’t let the layers dry too much! 🙂

This door will look great set into the wall of cabinets.


This is part of a painting series. Above are links to the other paint series posts.
{Plus aging wood instantly…my most popular post}
What have you thrown paint at?
Look around your home and let me know what you can try this technique on in comments below.


Appreciative for the strengthening on the web diary posting! Fundamentally put your blog segment to my most esteemed blog list and will channel forward for additional updates. Basically expected to record a word to offer imperative because of you for those incredible tips.
Sorry, but am I just the one who can’t watch the video? I love the way the door is, but it doesn’t show how it blew up the painting by knocking, scratching? Looks like the video’s gone. The colors chosen are beautiful I would love to try this technique, but I do not know how to lift the paint.
Thank you, Ester, for letting me know the video disappeared. I don’t know why but my videos tend to randomly disappear. I did put it back in the post, so you should be able to watch it now. Please let me know if you have any more issues.
Oh I really love the look of this and the technique is awesome! I need to try this as soon as I can! Love the colors you used! The technique makes it look like it came from grandmas house…just love it!
Thank you so very much. I was inspired by an old painted cabinet in one of my grandparent’s old outbuildings.
Oh?? Supprise! That’s the way you make that pallet?? I can’t believe! :))))) Usefull!
It’s a fun technique!
This is a terrific technique! What delicious texture and color you’ve created on the surface of that door! I need to do this today! Lol!
AWE! I love finding projects that I can’t wait to try.