
Workshop Series Part 1 what did I get into now
Workshop Series Part 1 what did I get into now!
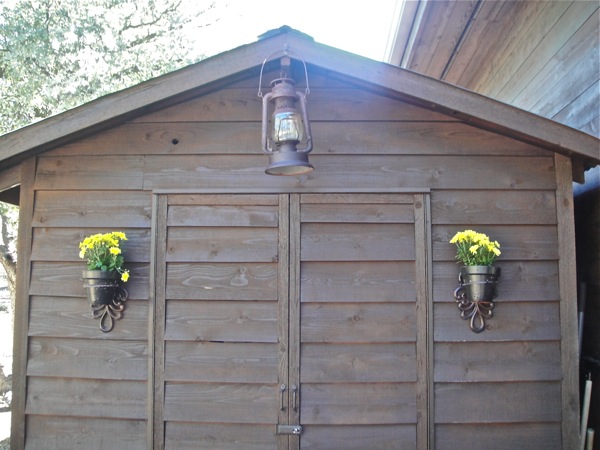
I have the cutest little wooden workshop {on the outside}.
The inside has been a whole other story. I’ve been too ashamed to even think of taking a cluttered “before” picture.
After opening those cute double doors, the first thing was my miter saw sitting on the floor right in the doorway.
I had to step over the miter saw into a spot just large enough for my shoes.
This spot was the only place you could see the rustic wood floor.
While standing in this one spot I would reach across to grab what ever I needed.
And I know creatures lived in there…just as long as there were no snakes.
Since I decorate, design, and organize I decided it was about time to apply these skills to my own cute little workshop.
I designed a decorating plan and set up a $300 budget and gave myself one month to get r don {in my spare time}.
About 75% of the plan is organization and just where am I gonna put everything…and add style.
Below is a list of tools and items I needed {or hope to find room for} in the workshop.
That Miter Saw
Planer
Drill Press
Table Saw
Table Sander
Scroll Saw
Band Saw
Router
Variety of Hand Tools
Metal Tool Box {large on wheels}
Clamp Table
Hand Clamps
Two Work Tables
Paint storage
Wood and Molding Scraps
and a Billizion screws, nails, bolts, washers and other junk stuffed into those plastic drawer bins.
Did I mention my cute little workshop is 6′ X 8′?
Did I also mention…no plastic drawer bins are allowed in my design?
Here’s the colors I plan for the design.

And the style is none other than Country Design Style!
It took a full day with the help of “my guy” to get the workshop completely empty. This is when I started wondering “What did I get myself into now?”
I sorted as I went using my sort cards.
If you click the words sort cards you can download the sort cards to use in your little wooden shed, garage, or kitchen junk drawer:)
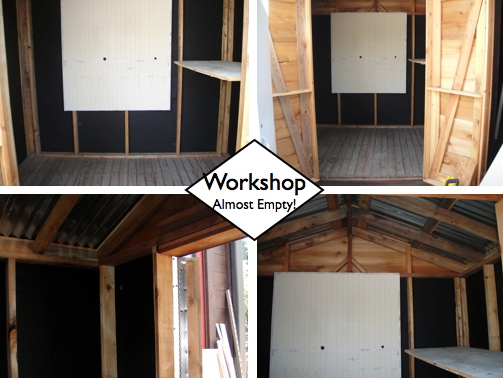
The black on the wall is tar paper we had put up for waterproofing the shed. I wanted to put bead board between the studs keeping the studs exposed, but it’s just not in the budget at this time. Instead I plan on loads of primer and light gray paint. I do love the rustic wood floor and plan on staining it dark. Also love the corrugated metal ceiling!
So follow along the workshop series and see what I end up with.
Next Workshop Series Part 2 or That’s not gray hair…it’s paint!
Did I mention my cute little workshop is 6′ X 8′?
Note this post was moved from Homa Style, my old website.
Linked up to Shabbilicious Friday!


Hello, I read your blogs daily. Your writing style is witty,
keep up the good work!
Hi, I do think this is an excellent website. I stumbledupon it ;
) I am going to return yet again since i have book-marked it.
Money and freedom is the greatest way to change, may
you be rich and continue to help others.
I found my way here via Back Porch Musings on FB. My hubby, two teen boys and I just spend a full day cleaning out our garage. While it is not a cute detached shed, it used to have my son’s show rabbits and was a complete mess of junk and fur. I am looking for ideas to pretty the potting bench and I’m looking forward to seeing your storage ideas.
Elizabeth, I happy you found CDS! Back Porch Musing is incredible. To be honest, the workshop is done and I L~O~V~E it!!! There will be a total of 8 series regarding the little workshop. With many storage ideas. I plan on moving a post each Friday, but you know how plans go…but I’ll do my best.
Darling, but I know what you mean about all the tools without a lot of space. I’m in the same boat, especially since my wonderful husband bought the contents (wood only…all in pieces with no instructions for assembly) of a furniture factory. Please kill me now.
Wow! Lol! Do you have your hands full!!!!! I hope you follow along with the workshop series. There should be a couple of good and some unique ideas. I will follow along with you to see what you guys do with all that wood.