
Frame made with 2 by 4
Do you have pieces of 2 by 4 wood hanging around the garage? Here’s a fun project that adds rustic decor. A frame made with 2 by 4 wood. 
Frame made with 2 by 4 boards leftover from the garden bench.
Warning, I might have a tear fall on my computer while writing this.
Most will be tears of endearment. 🙂
My final goal is to share with you how to make a picture frame made with 2 by 4 boards.
Frame made with 2 by 4

This is an oil painting of my grandparent’s farmhouse. It was painted from a photo I took at 13 years old by a friend of my mom. Mom has two paintings. One of the farmhouse at a different angle and one of the old barn. My grandparents were moving to town and leaving the old farm in “the Osage.” My grandpa was ill and farming was becoming too hard. At 13 years old, I knew I wanted pictures around the old farm. I cherish each of those pictures…
but that frame!
It’s been painted every color from white to almost black. Right now is a reddish brown. Then the other day it hit me why I didn’t like the frame and was always changing the color. The frame at any color does go with the details of the painting. The frame is busy with details making everything too busy.

Usually, when I want to display the painting or take a photo for the website, I remove the frame. The painting needs a simple frame. A farmhouse frame.
This 4 room farmhouse was basic. A wooden house with boards for trim around the windows and doors. The front and back porch pillars were boards. A bathroom was added in the early 60’s. Inside there were smells of homemade bread, sounds of laughter, sights of basic farmhouse decorations, tastes of peach cobbler, and feelings of love and family.
My grandpa walked every inch of the 365 areas and walked into my heart. He only lived two years in town. Today, Groundhog day is the anniversary of his funeral. An emotional day for me still.
But let’s set that aside and talk about making a frame with 2 by4 boards for any special picture.
Note: if you’re not into woodworking and just want to see the finished project scroll on down the page.
Here’s the list of supplies and tools to fit a 16 by 20 frame
1) 2 by 4 by 8′ plus a board around 28″
Router with 1/4″ rabbeting bit
Miter saw or box
Measuring tape
Pencil
Angle
Clamps
Wood glue
Sandpaper
Dowel pins
Dowel pin markers
Mallet
Drill and bit the size of your dowel pins
Paint
The Steps

Clamp the boards to your workbench and router along one edge. This is the back edge the picture fits into. You will use more wood for the frame, but it’s easier. Since I have plenty of leftover wood from the garden bench, I chose easy. If you wanted a more detailed frame, you could use different router bits along the other edges.

Cut the boards to size. The measurement is from the routered indents.

Lay the board for the frame. Notice 3 boards were cut from a rough-sided board and one from a smooth board. Happens when you’re making projects from leftover wood. I’ll work it out with paint.

Next, assemble the frame using an angle to mark along the 45-degree cuts.
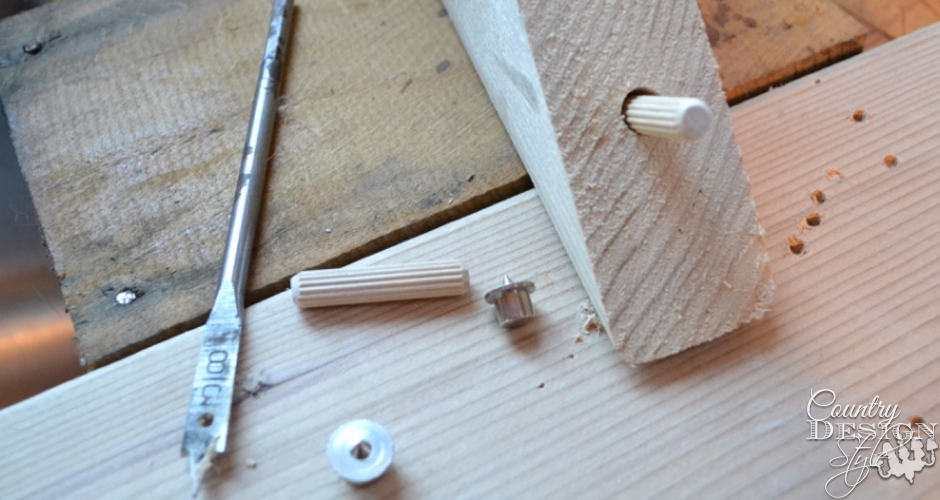
Following the angle of the line drawn drill a hole slightly deeper than half the length of the dowel pin into the center of one end of each board. I like to use paddle bits. I’m more accurate using the point.

To easily find the spot for the connecting board, use dowel pin markers. Select the correct size of the marker and insert into the hole. Line up the frame pieces with the pencil line drawn above and tap the boards together. This leaves a mark where you drill the other hole. Pretty cool huh? Above it, the rabbeting bit I used and I keep dowel pins in a mason jar with the dowel markers in a little zip bag and add to the jar.
Now add wood glue into the holes and along the angle. Tap in the dowel pins and tap the boards together. Use clamps to hold board firm until the glue dries.
You’re ready to paint.

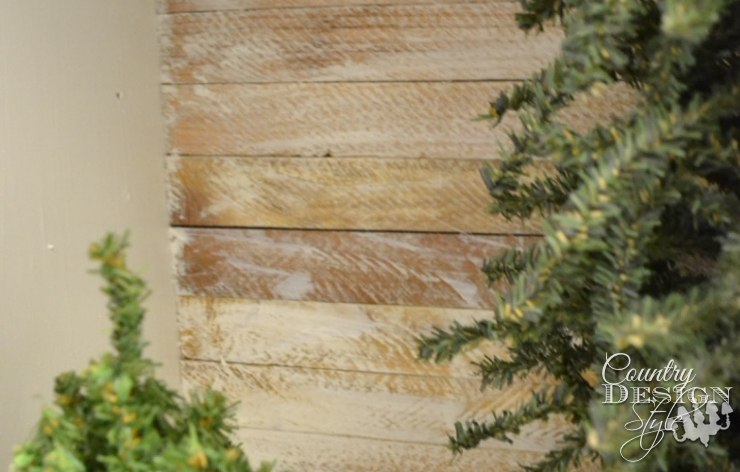
Remember that board that was too smooth? I dry brushed all the boards using white, soft green and gray chalk paints. On all the boards I left clumps of thick paint like above. Especially on that smooth board.

Then I hand rubbed a homemade oil clear matte finish which darkened the wood peeking out from the dry brushed areas. You can see the difference above. My homemade finish is 1 part clear matte oil and 1 part mineral spirits.

An old spindle was my inspiration for this paint technique.
Since this picture is an oil painting on stretched canvas, I used mirror clips to hold the painting in the frame. This would work with glass too. Hanging wire was used to hang.

I think my special painting has finally found a frame.

Now I’ll wipe the teardrops from my computer and enjoy some sweet memories.
Thank you for reading along and walking down farm lanes with me.


Hi Jeanette, I watched your video about the dowel pin markers. That is great advice. Thanks for sharing. How do you guarantee that you are drilling at the correct angle? Thanks
I love your story because this art is a memory for you and your family will also grow up with this treasure in your home.
I am a professional picture framer (25 years) and family history is a passion of mine. I am honored when people bring me their family heirlooms to frame so we can continue someones legacy and make them into a memory for future generations.
Your framing was wonderful, I loved the rustic wood on your piece and because this is an original oil and the wood frame only touches the edges of your art this is fine. Show us more ideas for your frames! I helped someone use a barn window from their families old barn to put generations of wedding pictures in them.
If anyone is thinking of framing valuables and anything paper you must use the right materials to keep them in an acid free surrounding to preserve them properly and never put your photos right against glass or they will become damaged. This is where a trusted framer is needed who has the experience in this area. Because of my love for preservation, It worries me when I hear of people framing their valuable art and treasures themselves. This is really a special skill that should be done by a professional if you want your items to last.
Thanks Jeanette for your creative ideas. You make life fun and certainly inspiring! I love reading your posts.
P.S. If you have any questions in the framing area, it would be my pleasure to help answer or give suggestions.
Colleen
Thank you Colleen!
Wonderful story, it will mean so much to your children. Thank you for sharing.
Dawn, is important to me and others to share those old family stories before they’re forgotten. Thank you for reading along with me.
Thank you for sharing your beautiful frame and the poignant story behind the painting. You are a remarkable woman.
Lora, you’re so very sweet. Thank you for reading my story.