
Pump organ makeover with lots of storage
Listen closely.
Do you hear it?
It’s a light tapping. It’s the tapping of feet dancing. Mike and I are dancing into the night because the pump organ makeover is DONE!!!
After months of sitting outside under a big blue tarp, the organ is inside, full of storage space, and painted pretty!
This post may contain affiliate links. That means if you visit a site from a link in this post and make a purchase, I may make a small commission at no additional cost to you. Click to see my disclosure policy.
This is part of the monthly themed junk makeover. This month is Paint it Pretty! Make sure to visit the project at the bottom of this post.
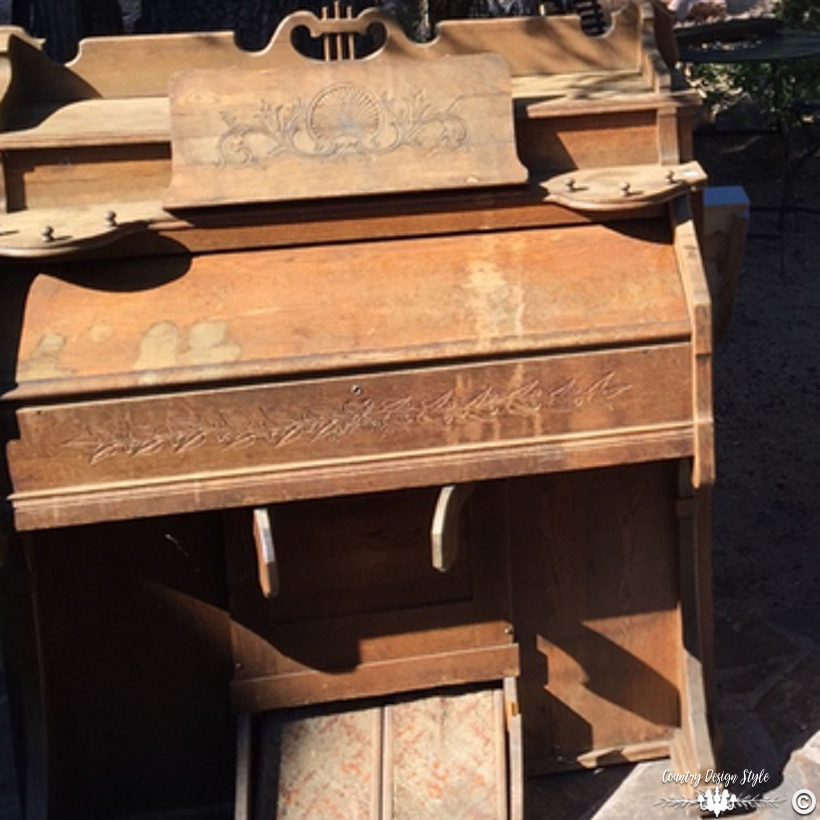
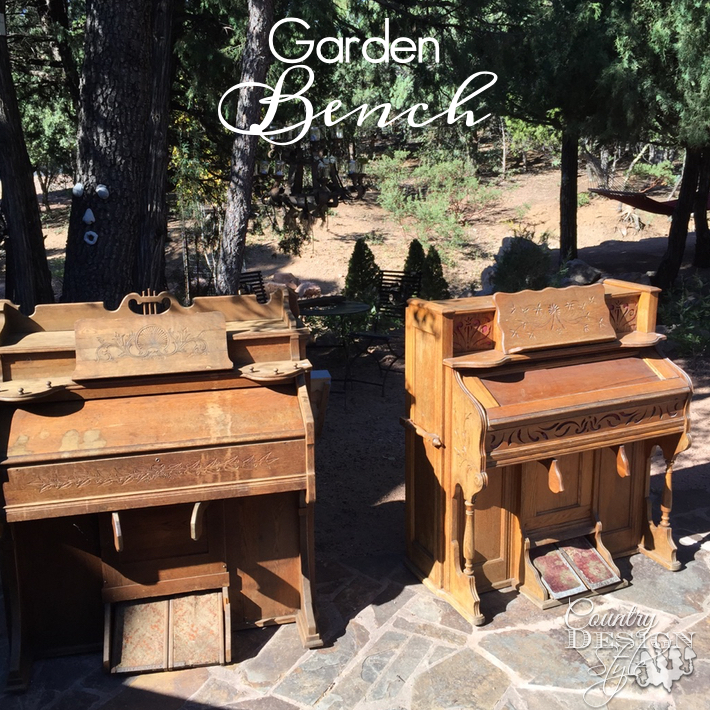
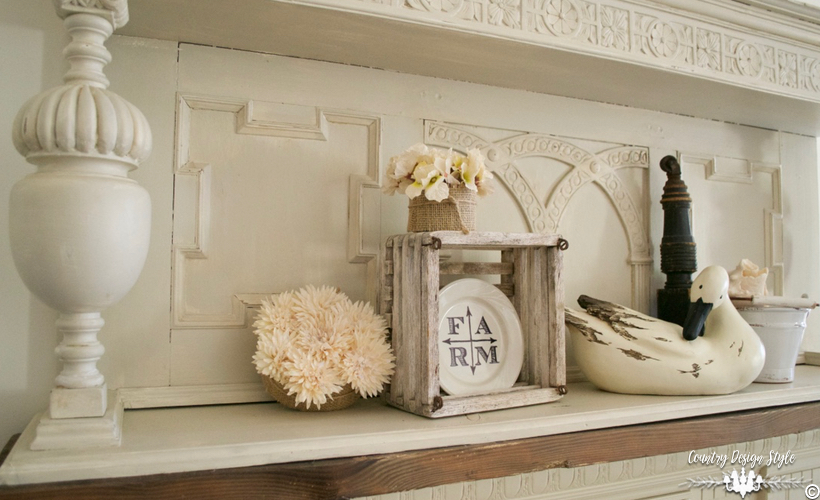
This pump organ was bought at our local Habitat for Humanity ReStore for $50. It was such a great deal…I bought two! The first one was turned into a garden bench, a potting bench, a faux mantel, a chalkboard and a vintage style table lamp. Plus I still have pieces for more projects. It’s surprising how much is inside a pump organ!!

For this organ, I wanted to gut the insides for loads of storage. Otherwise, I wanted to keep the organ intact. I picked Rustoleum’s Chalked Paint in Country Gray for the paint. I love the color and how easy the paint goes on. I didn’t have to do any sanding to the organ before applying the paint…whew! I did write a post about sanding the chalked paint, using waxes, and “where” to sand!

Then I used a mixture of leftover oil-based stains for a surprise color when you open the organ. I made a cubby that would fit inside the organ where the keys use to be. At first, I thought I would use the keys as a shelf but realized they would take up too much room. Currently, the keys are hanging in my craft room and still might turn them into a shelf for another area.

Above the organ is getting busy as a desk with all that storage!!! I turned the area where the pedals for the pump were into shelves with a small door. I found dollar store bins that fit perfectly to hold office supplies. The panel was turned into a door with a large area for massive storage! The storage continues behind the side panels.

The organ had dated “bump outs” that I cut off. The bump outs had little finials. So, I used two of those finials to help the roll-back panel lay correctly when open.

I cut out the front panel for a drop-down to make the organ desk height. Hinges were added. To close the organ the front panel folds up and rests on two more finials.

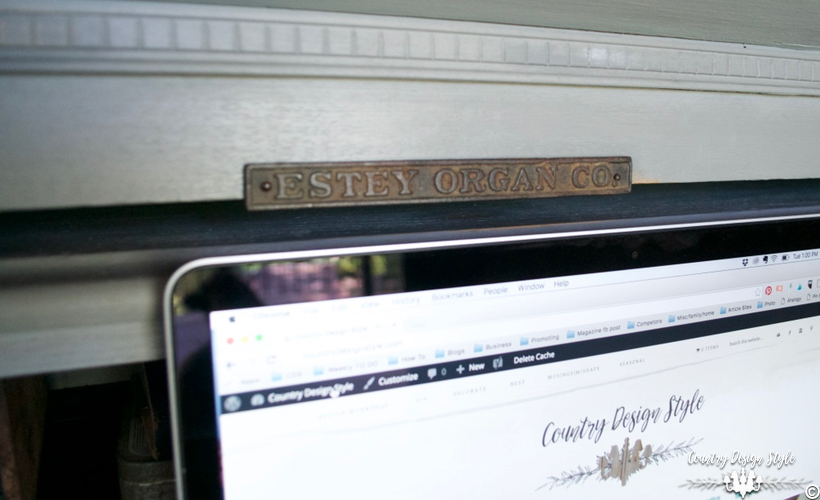
To hide where I cut the bump outs I added dental trim. The metal plaque showing above the computer was on one of the pedals. It reads ESTEY ORGAN CO.

I’ve used several colors of Rustoleum paint on other projects. I love the colors but love the price more! On Amazon, a quart is under $20. The paint performs like expensive chalk-based paints. Give it a try on your next project.
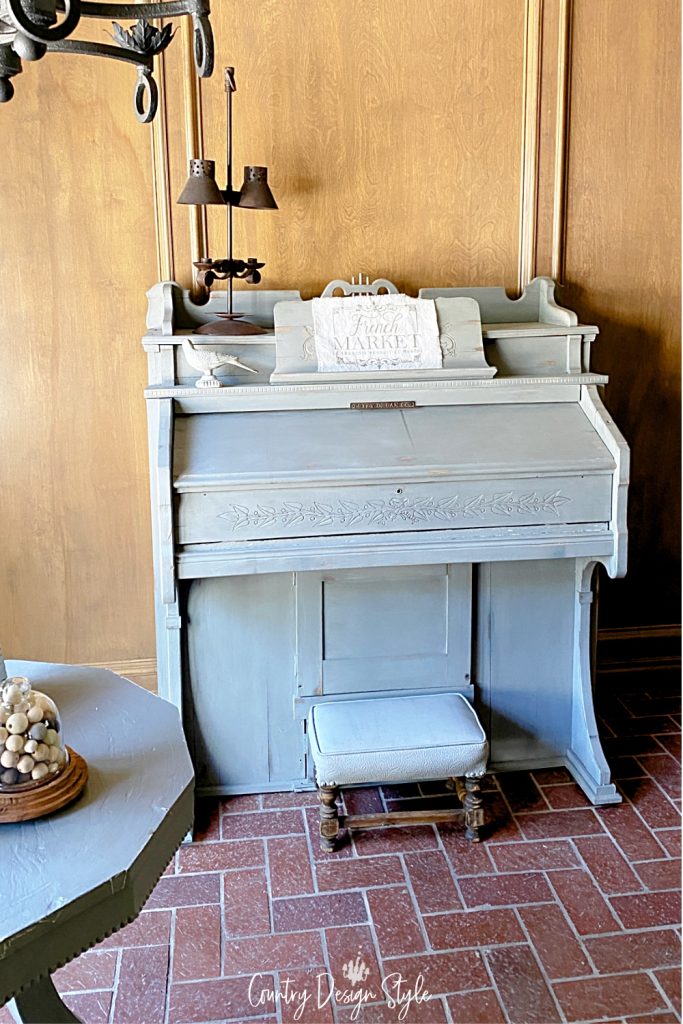
Above it the pump organ in our new to us home in Oklahoma. It sits perfectly in this unique area.
Update: I’m creating a painting series on guides for different types of paint. The first in the series is chalk-based paint that you can read here.
While our feet are pooped from dancing, we’re going to rest them on the ottoman and watch Netflix. We’re watching the series “Life.” Have you seen it?

Join me and visit the other fab junk makeover painting projects below. Thank you for letting me join in this month! 🙂


Join the newsletter

Subscribe to get our DIY HelpLetter each Thursday. Plus grab your Interior Decorating Ideas e-book.


Jeanette, My husband and I bought a house last December, with a piano and pump organ in the basement. We have been busy remodeling and now that we are getting rooms done and unpacking, I need bookcases and storage places for the grandkids toys. (Our last house had built in storage) I have noticed the beautiful wood work on the organ and wondered if I could reuse it somehow. Any advice for making it into a bookcase up top and storage for toys below?
Hi Candace, A pump organ has quite a bit of storage. Just remove the pump, keys, and all the wires, and basically everything inside. Then you can build shelves for books or toys on the inside. It is a lot of work but if I could do it most anyone can.
THANKS so much for this post including the steps you took. I agree, if you can restore an antique piece, do so, don’t throw away history! Unfortunately, most musical instruments like organs and pianos are much too cost-prohibitive. We have repurposed our church’s clunker upright piano into a buffet and are in the process of doing another to sell. (Learned from our mistakes and lack of knowledge so this one is going much faster!). However, my heart has been set on an old pump organ to repurpose as a desk for myself. (*I will be looking at one today!!!). Your post has helped prepare me!
Gail, I hope you find what you’re looking for. They make wonderful desks! Remember to take pictures both before, along the way and after. You’re welcome to send me photos too!
Hello Gail,
Did you ever find that pump organ? I have one that I would like to give away. It is taking up space and I’m ready to give it another life. I am a DIYer myself but just don’t want to take this project on. I do not know where you are physically located but I’m in central MA. Let me know if you are interested. The wood is in really good shape.
Will you please share how you removed the old organ parts? I want to do a similar project and can’t seem to decide where to start removing the unwanted pieces!
Here are the basic steps I used. First I removed the back. Since I wanted the front to stay intact, everything inside was removed from the back. I started from the top and worked down. I tried to find the screws that held sections to the inside. But some parts had to be removed in pieces. The keyboard area did come out in one large piece. Mike had to help lift it out. The pump area had old fabric tape or something like that. I used a box cutter to cut it away. After everything was removed I had a bucket of screws and a ton of small felt pieces. I never realized how much felt was used. Plus there’s a lot of metal rods and small wood pieces. It took as long to remove the “guts” as remaking the insides. Best of luck with your project. Let me know how yours turns out. I would love to see the finished project! 🙂
Thank you for the honest reply Jeanette I’m the same way. I have restored several pieces it’s very rewarding breathing life into an old unloved piece. Sadly you are right recycling some pieces is all that you can do. You have a beautiful talent. Continue to share it with others.
Thank you, Diane. I have such respect for people like you that take the time to find the life in old forgotten pieces. I had an uncle that could revive an old piece to its original state. He would spend months working on a piece. He also built incredible items like dining room tables and chairs and grandfather clocks. I wish I had the patience. Thank you for your kind words. I love sharing unique ideas with readers. Those that don’t take too long. 🙂 I’ll leave the pieces that can be restored for others, like you.
What ever happened to restoring a piece? There was so much history in pieces like this
Diane, I have to agree with you. When a beautiful piece can be restored, that is the way to go. When I bought the organs, I checked into having at least one restored if not both. Unfortunately, both organs were beyond repairing. They could be restored if I had a working organ that I could take the parts. But that would defeat the purpose. Inside the organ were hundreds of broken intricate wood pieces and wire covered in rust. Some wires had rusted through. The pump was brittle. And the felt! Each key had 4 pieces of felt some as small as 1/4 inch. Felt was glued between wood, keys, and anywhere metal touched the wood. I did find someone that restores antiques and was told both organs were ready for the landfill.
I treasure old antiques and love when others love and enjoy them in their home. For me, I love the broken pieces. Things that can have a new life and not fill the landfills. Thankfully everyone has different tastes and styles or the world would be a boring place. Thank you so much for commenting and visiting. 🙂
Wow…you got a lump of coal and turned it into a diamond! And I’m gonna try the Rustoluem paint. Because so far of all the chalk type paints I still haven’t found one I’m in love with.
Barbara Ann, let me know what you think of the Rustoleum chalk paint. I like it better that CeCe but like ASCP the best, except for the price! Otherwise, I like homemade too. The organ was a big brown lump of coal!!! 🙂
What a fabulous idea, Jeanette for a desk! It has loads and loads of charm. Clever idea putting cubbies in the void. How fun it must be working from such a fabulous desk!
Marie, thanks for stopping by. So far I’m still busy filling it up. I’m surprised at how much it holds! 🙂
Jeanette, I have been dying to get my hands on a pipe organ to turn into a desk. Hopefully one of these days. Yours turned out amazing! I will definitely be pinning this for hopefully near future reference. ;o)
Lucy, thanks for pinning! I’m sure you will find one and I can’t wait to see your transformation. I love your projects. Thanks for inviting me this month. I needed the push. <3
What an unusual piece, and a great upcycle. Good colour choice too!
Thank you, Claire. It will be great to hide…stuff!
Jeanette, I love what you did with the organ! What a wonderful repurpose!!
Keri, Thank you. I sure it will get lots of use.