
Home Project Tour Before Blogging
I have been wanting to share something with you since I starting blogging! A home tour blog post on projects that came before the blog.
So, yesterday I woke up early and started clicking away.
No dusting, no vacuuming and no prepping for taking pictures.
I strolled around the house, clicking away at projects made before blogging.
Furniture

This cabinet was the first large piece of furniture I’ve made. It was made to hold a large 80’s TV. Then I remade it to hold craft supplies. More useful now!
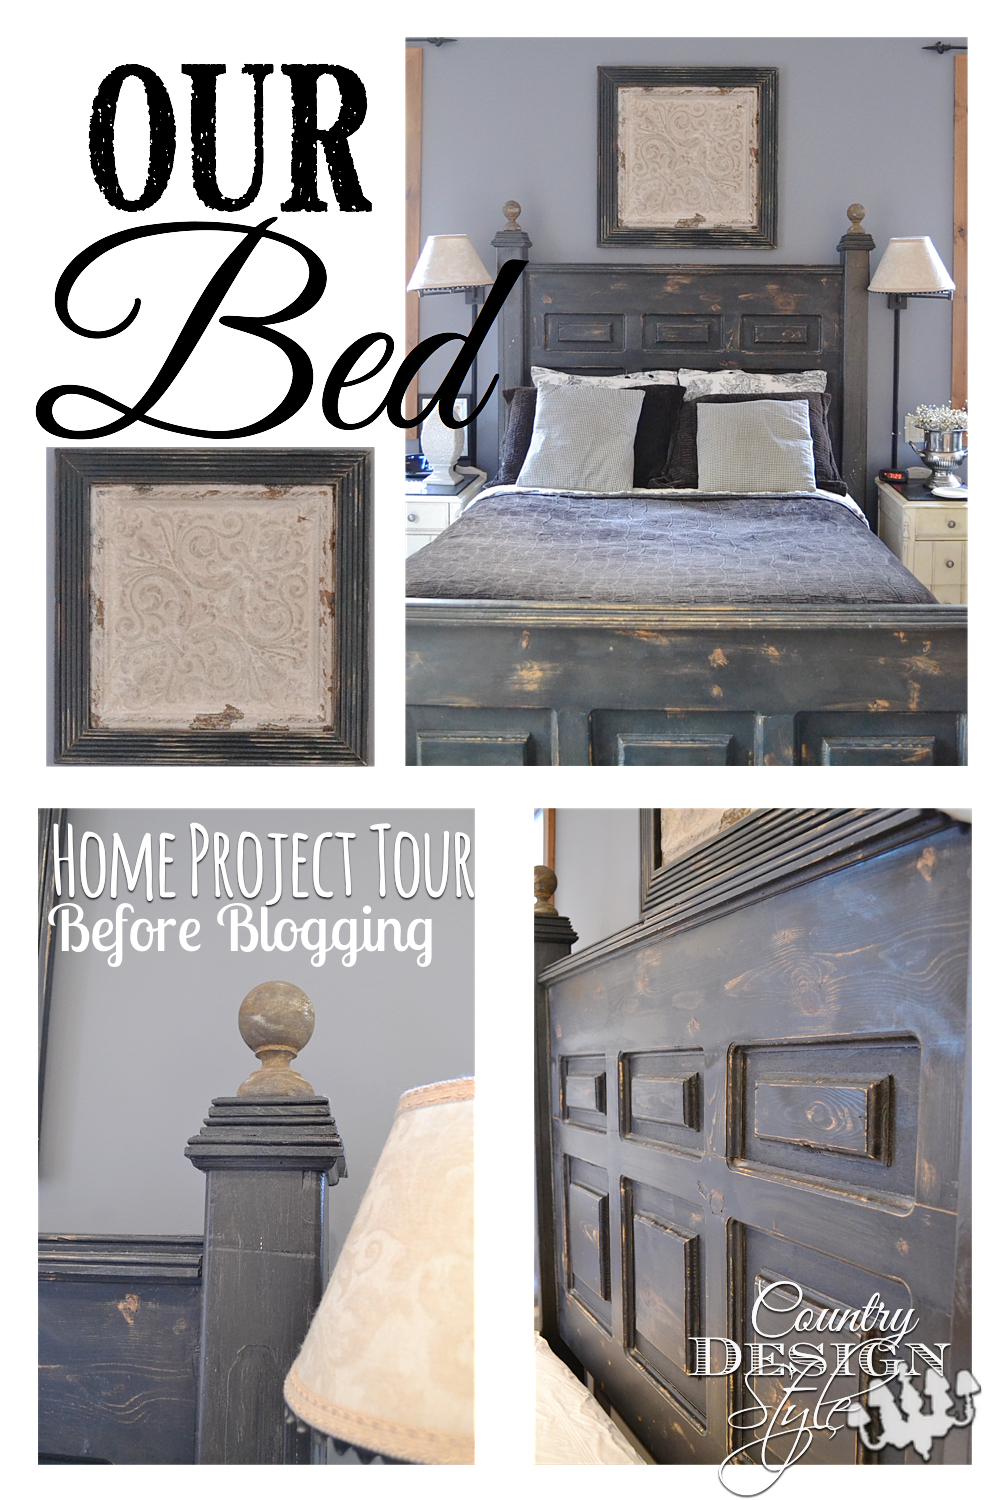
Our bed was made using scraps from a home construction site plus garden finials. The tin ceiling tile was bought on the streets of New York during a vacation. We had the opportunity to fly first class and we were able to stow it with the captions compartment. This was before 9/11. I made a frame using molding.
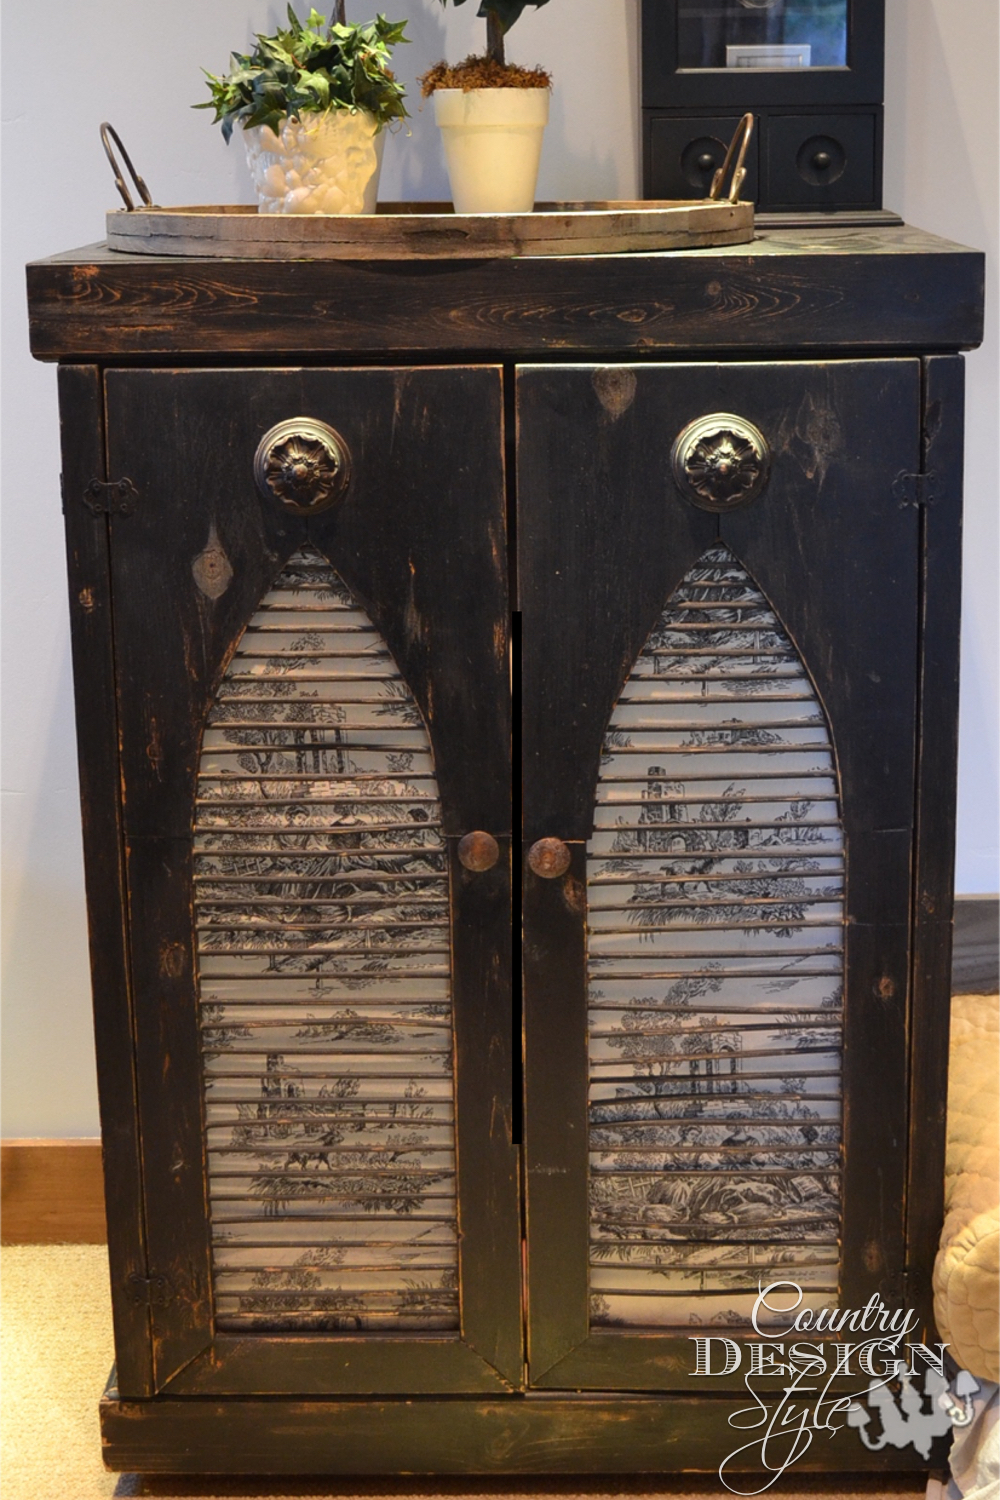
This strange piece was made to hide another TV. We lived for 2 years in the heat of Scottsdale, Arizona. I survived with a backyard pool and this cabinet. It has wheels to move the TV around the patio. The doors are double hinged to open completely. Now it just holds pillows.
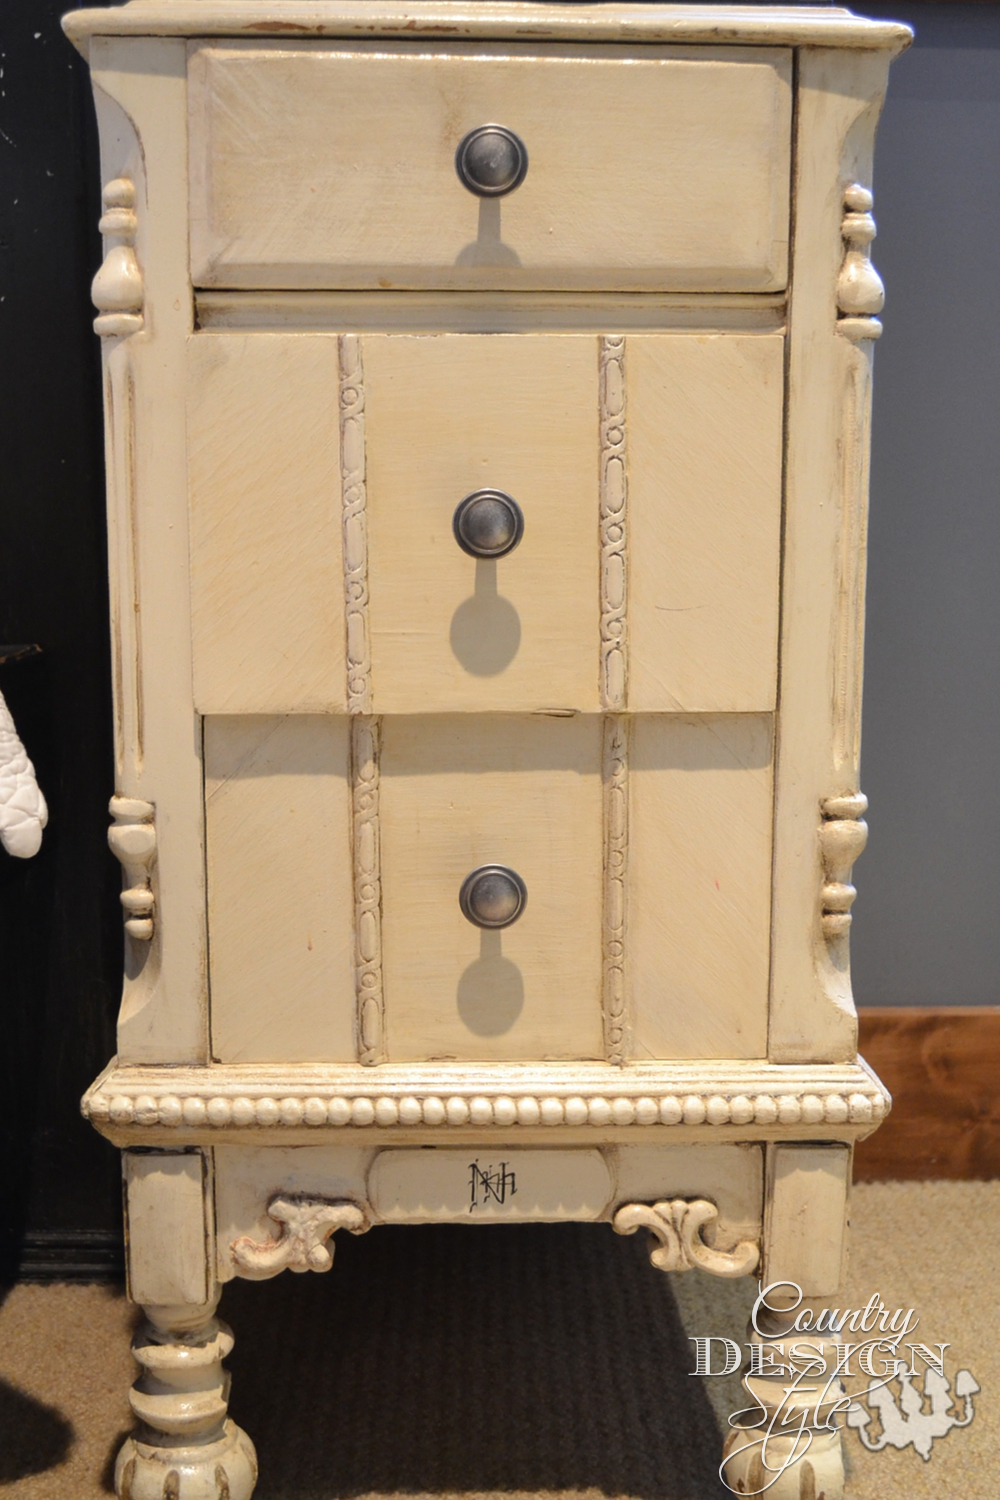
Our nightstands were the sides of a broken vintage dresser. I cut the broken middle out and made it into something else??? Can’t remember…but I kept the sides for two nightstands.
Notice the little black design on the plaque along the bottom edge? That will appear several more times. It’s our “logo.”
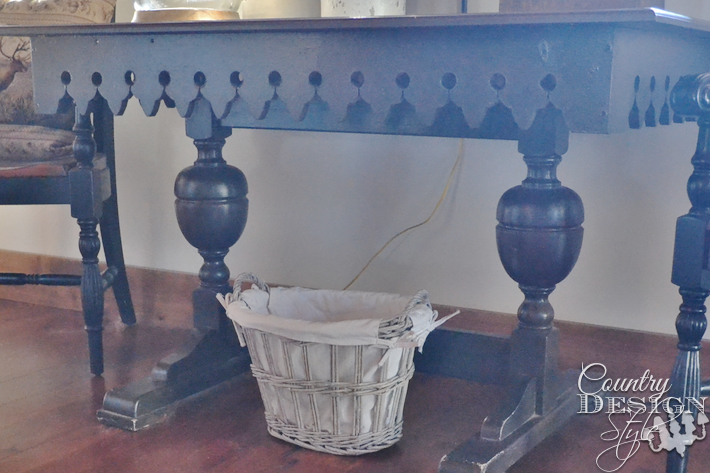
I can now get a good picture of this table. It sits under the living room windows and the lighting just doesn’t work. :/
I bought the legs at a yard sale for $4.50! No top, just the urn legs. I made the top.
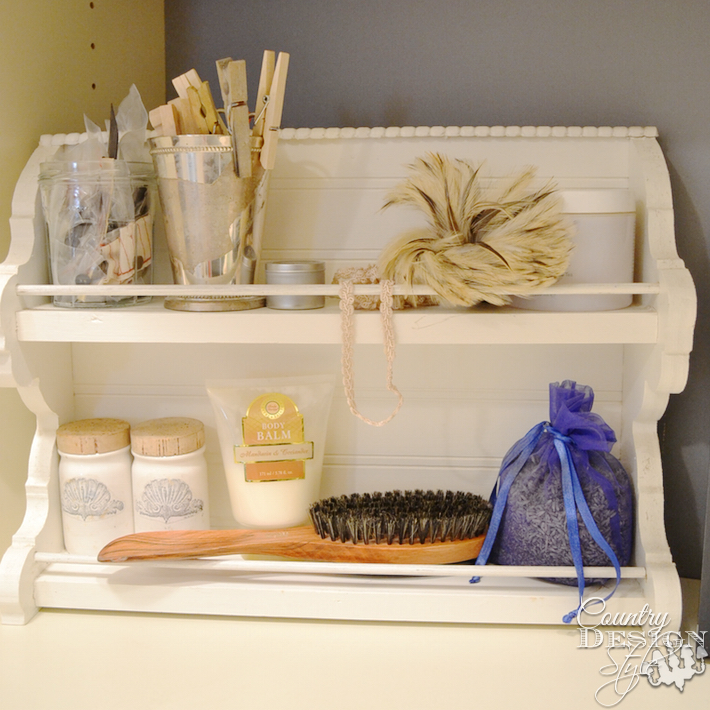
This little shelf sits in our closet. It was made to hold little teacups….now it holds closet stuff!
Wall Decor

I knocked this project off from a home catalog. The originals were tin. Mine are wood.
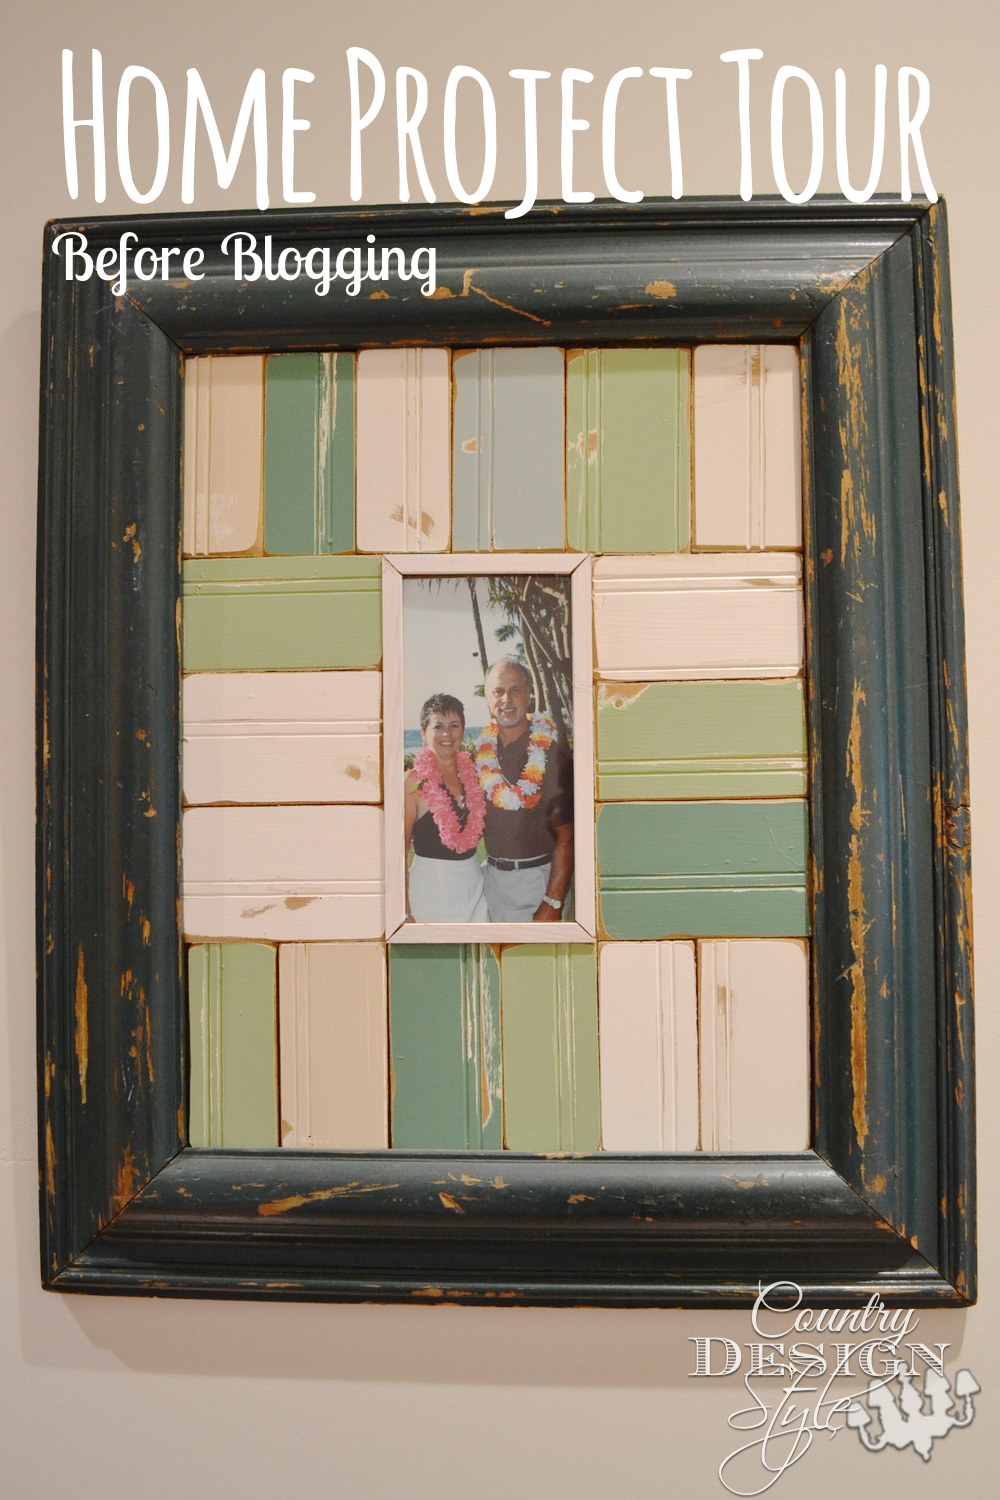
This frame was a thrift shop find and another knockoff. The molding was scrap pieces of beadboard. Painted and distressed. Mike and I were in Hawaii. Guess you could tell by the leis.
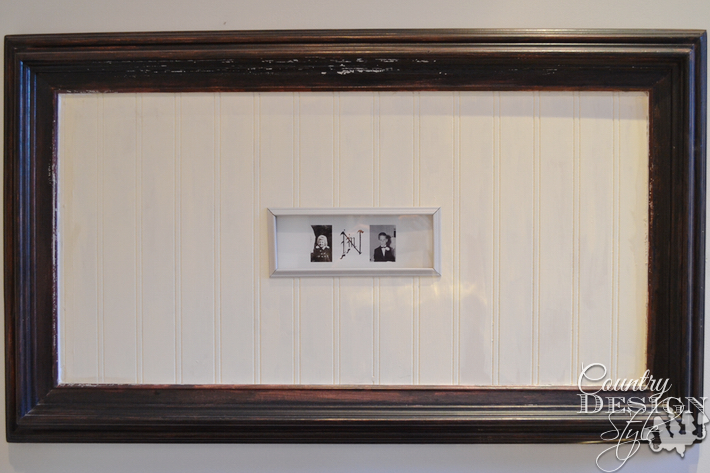
This thrift store frame is large. Beadboard was glued in the middle. Then I made a small frame for the middle. Frame in a frame. The pictures are Mike and me when he was 7 and I was 6. The photos would have been taken about the same year.

Another logo! This was jigsawed outta wood to sit in one of those round windows that are in stairways. In this house, we don’t have a round window. So I cut it smaller to fit in an inexpensive clock…with the guts removed.
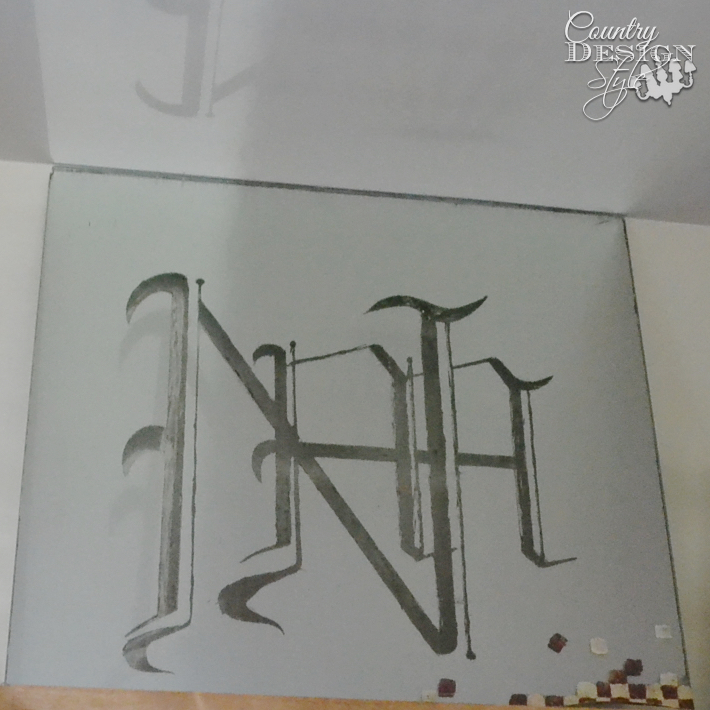
That logo again! The mirror is thick and frameless. I drew the logo on the back… backward. Then I removed the silver of the mirror using a Xacto knife. Not a project I would recommend!!! Then I the blocks painted on the bottom right corner because…
when I was almost finished I knocked the mirror off the ottoman and the corner broke off!
I wasn’t about to stop the project after all those many nights scraping. So I glued the piece back on and use the blocks painted on the front to hide the crack.
“Broken pieces mend stronger”
I do several live videos with these blocks as a background
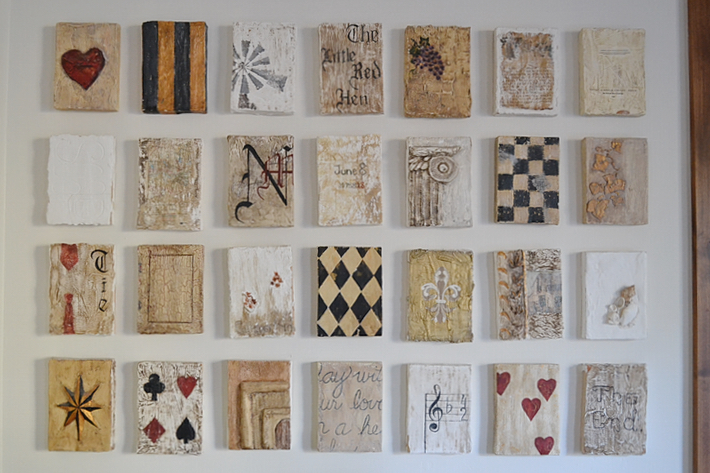
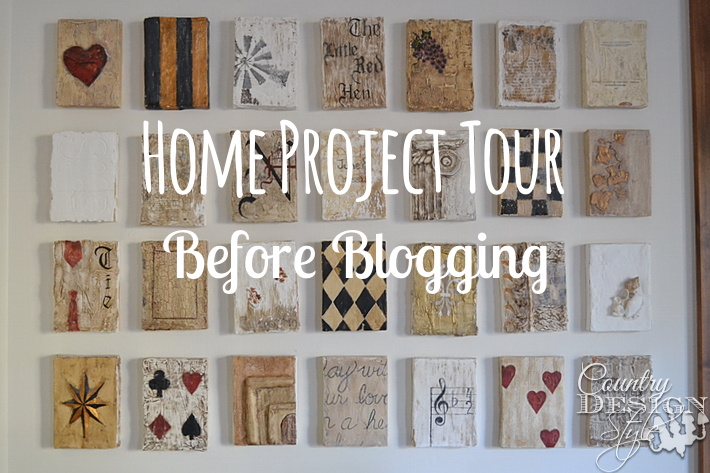
This was another knockoff. In the late 90’s home stores carried blocks with different designs. They were expensive!! Like $70 each! I made all these for under $25. I cut up 56 pieces of plywood. Glued them by twos to make thicker blocks. I mixed plaster of Paris, coated each block and let dry. Then getting “up to the elbows messy” and creative I added more plaster and paint. Each block has a special meaning to us. We added a title on the back of each one. Notice the logo and the “The little red hen.”
Update: A popular question I receive is how I made the blocks. So, I recreated the idea for summer blocks. I have to admit the summer blocks are not as dramatic, but the tutorial will help you create your own blocks. Read the tutorial at art blocks.
Lighting
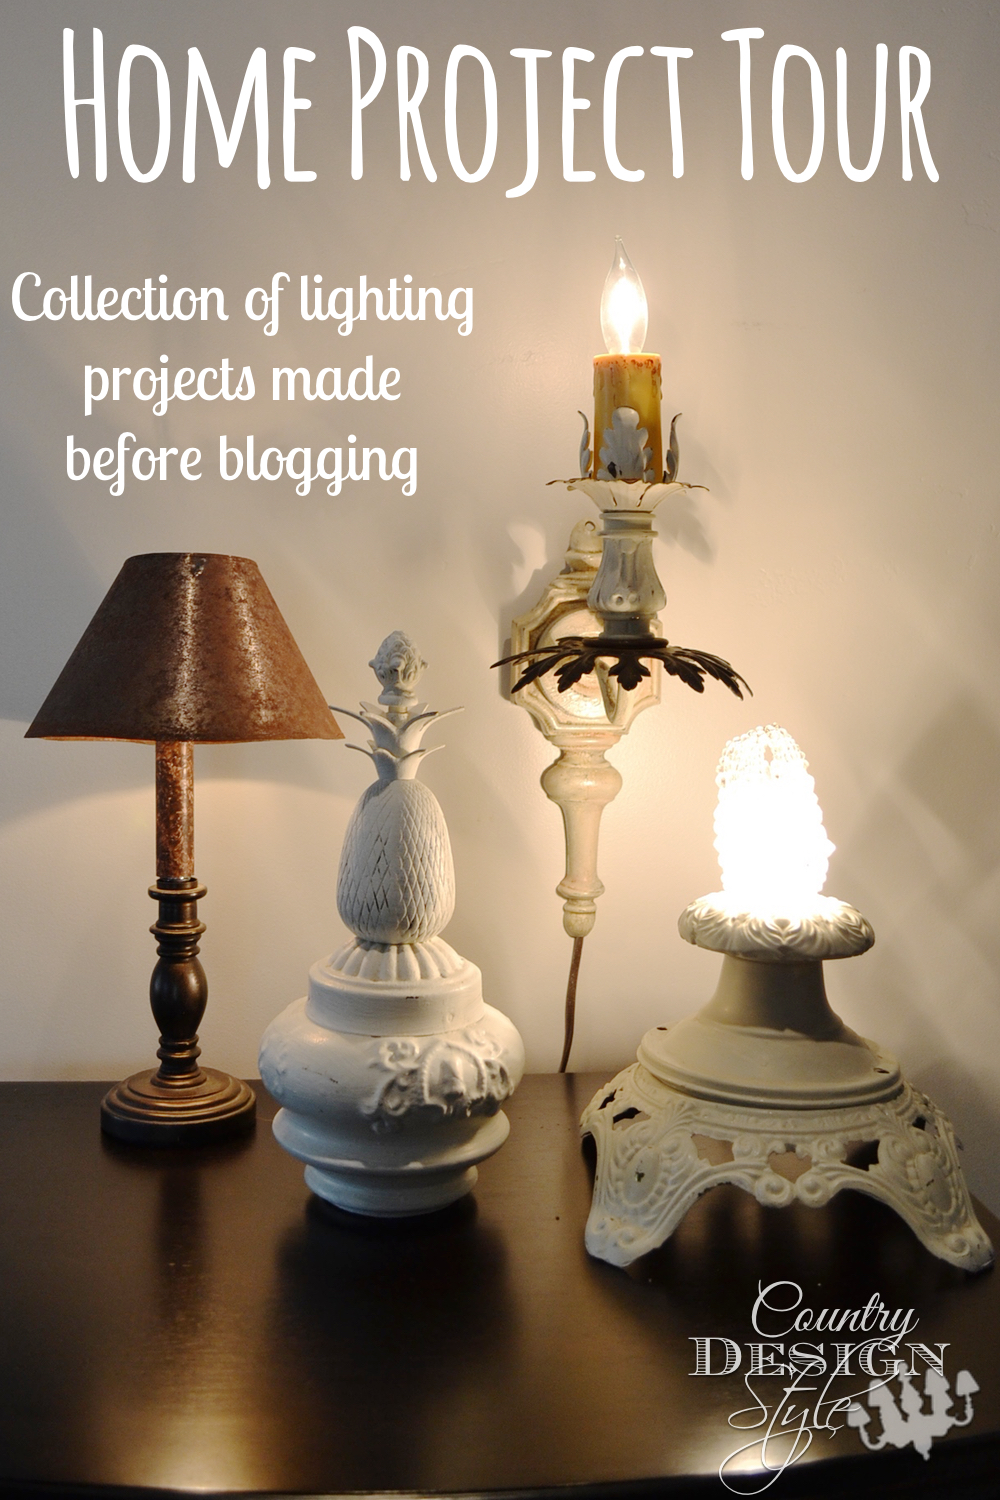
If you follow me or have read the about page, you know way before blogging, I made home decor items to sell around local shops. My dad got in on the act and would keep his eye open for lamps and chandeliers. When my parents would visit, dad would bring in a box of light bits and pieces. I found these in a cabinet and set them up to share.
I use this double-sided tape to hold pieces together temporary.
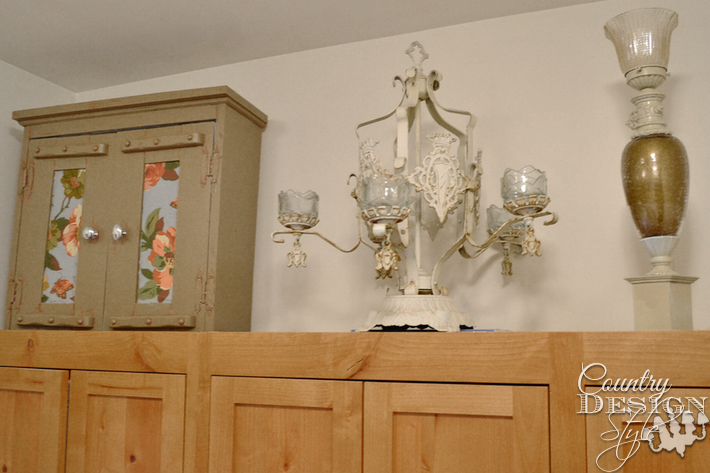
This is the top of the laundry room cabinets. The chandelier was another of dad’s finds. I was a hanging light, but removing the wiring and adding a lamp base, it becomes a tabletop “chandelier.” The gold piece on the right was a lamp with the wires and harp {thing that holds the lampshade} removed and a small globe added. The cabinet on the left…
needs redone!
The Strange (or cartoon)
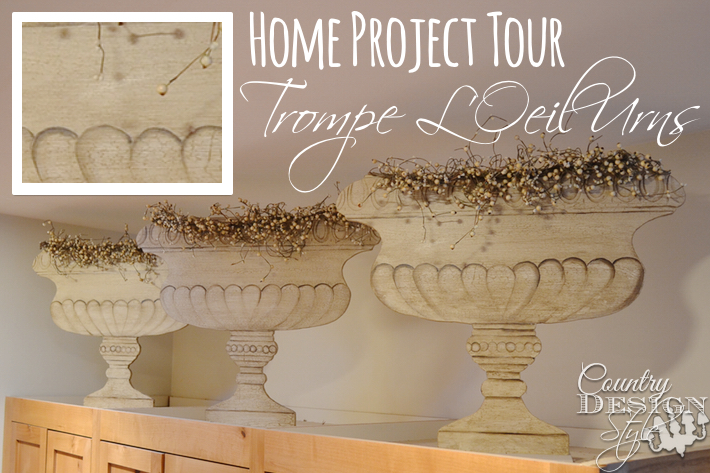
This one is…strange. When we move to Scottsdale for those hot two years, the house had a huge area for the TV built into the wall. The top was large and needed something huge. I saw large urns that would be perfect…except for the price tag. Plus the weight might have been an issue. I could see them falling down through to the floor below.
But I wanted urns!
So I drew urns on a sheet of MDF, cut them out with a jigsaw and then painted them. This was my first and only attempt at Trompe L’Oeil. {French for “to fool the eye”} I even used crackle paint in areas!
Whatever happened to crackle paint??
I would like to say, “that’s it.” But there’s more around here. I’ll save for another home tour blog post.
Let me know if there are any projects you would like more info or how to’s. I would be happy to recreate the project to show the steps. Home Tour Blog
Join the newsletter

Subscribe to get our DIY HelpLetter each Thursday. Plus grab your Interior Decorating Ideas e-book.


Hello Janette
I like your ideas of making something out of nothing. I do it too. I am most intrigued by that wall of plaques you made. Please please tell me how you did it? I have been wanting to make some similar forever but dont know where to begin.
Hey, Dawn, thank you for asking me about the blocks. I forgot to add a link to the post where I did a tutorial showing how I made them. Here’s a link to the post. It’s fun to create from nothing! Thanks for following along.
https://countrydesignstyle.com/art-blocks/
What a great tour. I love the tin and the bed. Awesome piece, Jeanette
I am in awe of your creativity. I don’t know how you even think of these ideas! I would like to know how the frame within a frame is attached.
Pat, sleepless nights! Actually it’s in my blood. I’m always thinking how was this made, can it be made differently, what else could it be turned into?? The frame within a frame could be done easily by inserting beadboard into a large frame and gluing on top a flat frame. That’s how I did this frame in a frame.
https://countrydesignstyle.com/cherish-frame/
The frame above, I cutout the middle of the beadboard. Then glued glass on the back with a photo and backing. Them made the small frame with trim to glue on the front. The small frame hides the jigsaw cuts through the beadboard. Thank you for visiting and the compliment. Hugs, Jeanette
That was fun! I love your furniture pieces and your urns fooled me too, I had to scroll back and look at them closer. Crackle paint is still around. You can find it with the craft paints or in the specialty finishes in the paint aisle. 🙂
Cecilia, I think I going to do a crackle project to share. I always liked using it and even crackled a bedroom set for a client years ago. I using just use glue for crackle, it’s cheaper. Jeanette
BELIEVE IT OR NOT. I HAVE NEVER SEEN A SPINDLE BEAD…I LOVE THE NECKLESS……DO YOU HAVE A PICTURE OF A SPINDLE BEAD?I LOVE PRIMITIVES AND COUNTRY A LOT…..YOU ARE VERY CREATIVE……….BETTY
Betty, The only picture of spindle beads I’ve seen are the ones in my post. I don’t think they are a real thing. Just something I made up. I love spindles since play around my grandparents old spindle bed as a child. Now I made things with them. Thank you for visiting! Jeanette
Your urns fooled me. I thought they were real. Very good. So glad you save all these to show us. I agree you are very talented.
Thank you Lori, Glad you stopped by. I truly believe everyone has a talent for creating. Sometimes it’s buried but it can be dug up! 🙂 Jeanette
you have been a crafty girl forever, is there anything you can’t do? such an impressive array xx
Yep! I don’t work on cars!!! Dad made me learn to change the oil and tires before learning to drive…Yuck. No green thumb either. 🙁 Jeanette
i despise having to put my hands under the hood of a vehicle, hate that black crap.. i have to wash my hands in boiling water after lol i can grow plants but i won’t ever be as crafty as you xx
WHAT IS A SPINDLE BEAD?????
Oh, Betty that was on another post. You can read about the spindle beads and turning old spindles into a necklace by clicking below.
https://countrydesignstyle.com/spindle-beads/
https://countrydesignstyle.com/old-spindle/
It’s basically cutting up a spindle into small pieces kind of like cutting a loaf of bread. Then drilling a hole and stringing them on necklace fittings. Makes a funky chunky necklace. Unusual and not in everyone’s taste, but I’m loving the one I made for me.
Thank you always Betty for reading. Hugs, Jeanette
Wow! Just Wow! Love all of them but I think my favorite is the one with the little blocks. I love that they have special meaning to you! And I loved crackle paint- maybe we should bring it back?!
Laura, Yea, whatever happened to crackle paint? With all the distressed and chalky paint projects you would think crackle paint would fit in somewhere! Hum, I have an idea. Watch for it soon. 🙂 Jeanette
Love the projects you’ve shown – you’re such a creative lady!!!
Anne, that is an awesome compliment, because I find you so creative and inspiring! Hugs, Jeanette
I love the craft cabinet and the bed! Great projects.
Thank you Bev. I was glad to be able to save the cabinet and reuse it differently. Jeanette